If you’ve dreamed of making homemade bread with a thick crispy crust and big fat holes like the finest artisan bread, but have been afraid to make the plunge, think again! No-Knead Bread is probably the easiest homemade bread you can imagine. It doesn’t require any special equipment like a stand mixer or bread machine and doesn’t involve the traditional 10 minutes or so of kneading – thus the name, no-knead! In fact, it only takes a couple of minutes to put the bread dough together.

Why Does No-Knead Bread Work?
If you’ve ever made a yeast-based bread before, you probably know that kneading is key to the development of gluten. If this is true, then why does the no-knead technique work?
The reason is that the long fermentation time of the no-knead bread actually forms the gluten strands that provide the strength and texture of the bread. Unlike traditional yeast breads, no-knead bread uses a small amount of yeast and a wet dough. The wet dough allows the gluten molecules to be more mobile which creates the characteristic elasticity of the bread.
As Serious Eats explains, “When that dough first enters a hot oven, both the carbon dioxide gas inside those bubbles as well as some of the water vapor trapped in them begin to expand due to the increase in heat. This expansion causes the stretchy bubbles to inflate—for a little while. Eventually, the proteins in that make up the gluten will coagulate and set, preventing the dough from expanding any more. The trick to airy bread is to get those bubbles to increase in size as rapidly as possible, giving them plenty of volume before the proteins have time to set.”
Whether you care about the science of no-knead bread or not, it works amazingly well!
Ingredients for No Knead Bread
When I was a kid, I made glue from a mixture of flour and water. Who would have thought that by adding some salt and a small amount of yeast to a child’s glue would produce such a spectacular masterpiece?
Bread flour versus All-Purpose Flour
You may be wondering whether you can use bread flour and all-purpose flour interchangeably in making bread. The answer is yes and no. The main difference between the two types of flour is the protein content in bread flour. The higher protein content is needed to produce the gluten which gives the bread its stretch and elasticity. If you don’t have bread flour, you can use all-purpose flour with the addition of some gluten. Specifically, you can take a cup of all-purpose flour minus 1 ½ teaspoons, and mix in 1 ½ teaspoons of vital wheat gluten to mimic bread flour!
Filtered Water versus Tap Water
Whenever I make bread, I always use filtered water. The reason is that tap water generally contains chlorine. Chlorine can inhibit the growth of yeast. If the chlorine level is particularly high, it can actually kill the yeast or impact the enzyme action of the flour. Bottom line, use filtered water when making bread.

Weighing Ingredients for No Knead Bread
One to the things that I learned early on in making bread was that a key to success was weighing the ingredients. The reason is that there can be a huge variation between the weight of flour and its volume. Specifically, one cup of flour can weigh anywhere between 4 ounces and 6 plus ounces depending on how you measure it.
In mostl of my recipes, I follow Julia Child’s suggestion that 1 cup of flour weighs 5 ounces.
Making the Dough
I started by mixing together the flour with the salt and yeast. Then I added the water and stirred the gooey mess with a Danish dough whisk. If you don’t have a Danish dough whisk, you can use a wooden spoon.
Basically you just need something to mix the ingredients together. The shaggy consistency of the dough reminded me of a bread starter which basically uses a 2:1 ratio of flour to water – the same ratio here.
 After I mixed the dough, I transferred it to my 8-cup measuring cup that I had coated with oil (Photo 1). Then, I covered the measuring cup with plastic wrap. Coating the inside of the measuring cup with oil was crucial here given the consistency of the dough.
I made the dough in the morning for it to start its long rise. Before going to bed, I placed the dough in the refrigerator for its continued development. Refrigeration is not totally necessary. However, it’s easier to form the dough if it’s cold than if it’s at room temperature.
Anyway, the next morning, the dough had expanded nicely and was full of bubbles (Photo 2).
 Forming No-Knead Bread
 Forming No-Knead Bread
I floured a piece of parchment paper and dumped the dough onto it. This is where the oiling of the measuring cup was critical. Had I not oiled the container, the dough would have stuck horribly to the container.
 I I sprinkled the top of the dough and folded it over several times to form a ball (Photo 3). Then, I covered the dough with a clean dish towel and let it sit at room temperature until it had doubled in size (Photo 4). Because the dough was cold from the refrigerator, this took about 3 ½ hour. Had I not refrigerated the dough, it would have taken about 2 hours.
Baking the Bread
 Baking the Bread
Before adding the dough to the Dutch oven, it was necessary to heat it at 450°F for 30 minutes. The knob that comes on the lid of the Le Creuset Dutch oven that I used is rated for a much lower temperature than 450°F. Some time back, I came across a stainless steel replacement knob that could withstand higher temperatures. This what I used on the lid.
I turned on the oven to 450°F. When the oven reached 450°F, I put my empty, covered 7 ¼ quart (28 cm) Le Creuset Dutch oven in and left it there for 30 minutes.
When I first started making no-knead bread, I was concerned about putting an empty pan in the oven at such a high temperature for that long, but there were no problems.
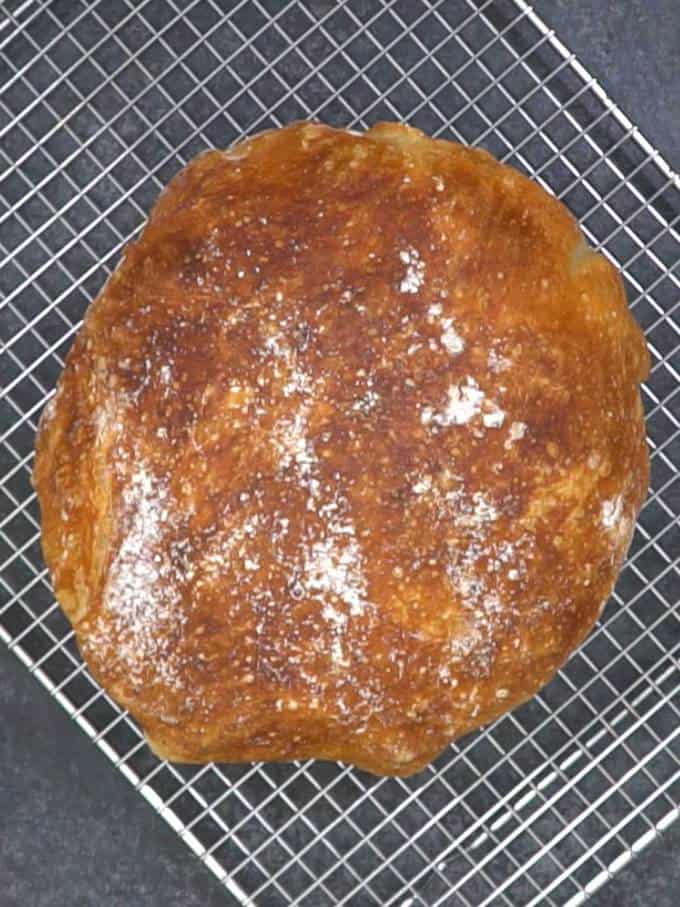
After the 30 minutes, I removed the pan from the oven, took the lid off, carefully lifted the risen dough on the parchment paper, and plopped it into the Dutch oven.
 I covered the pan with the lid, and placed it in the 450°F oven for 30 minutes. From what I’ve read, the covered Dutch oven acts like a steam injection oven that professionals use to produce that wonderful crust on artisan bread. That certainly worked here!
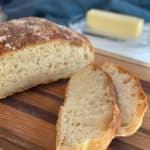
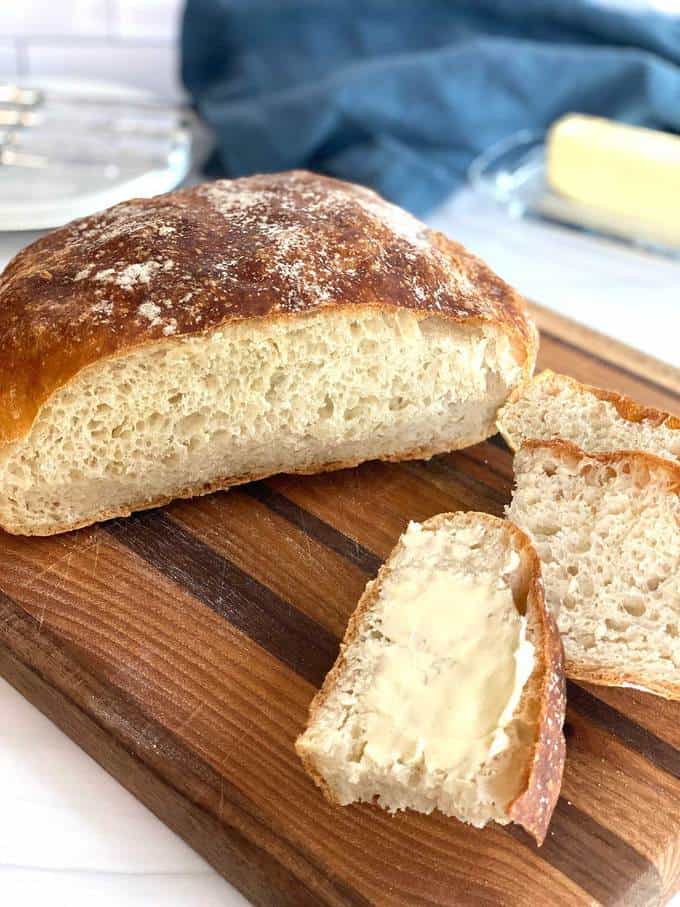
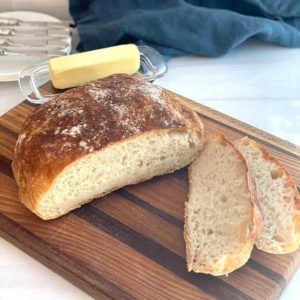
After 30 minutes, I removed the pan from the oven and removed the lid. Much to my surprise the bread had risen even more and was a golden brown. I popped the bread back in the oven, uncovered for another 10 minutes or so. Then, I removed the bread from the oven and transferred it to a wire rack to cool.
 To say that the bread was amazing is an understatement. The outside was crispy and the inside soft and full of airy holes. Yum!
 Chula’s Expert Tips
 Chula’s Expert Tips
- For best results, always weigh your flour. You’d be surprised at the variation in volume depending on how you measure the flour.
- This recipe uses only ¼ teaspoon of yeast and requires a slow rise for flavor development. Want it faster? Increase the yeast to 2 teaspoons and make sure that the water is lukewarm. The dough will have risen the proper amount in around 2 hours. If you want the flavors to develop, refrigerate the dough for up to 3 days at this point.
- This works best with filtered water as opposed to tap water. Tap water contains chlorine which can retard the growth of the yeast and even kill the yeast.
- It’s important to coat the bowl with vegetable oil. Otherwise, the dough will stick horribly to the bowl and be difficult to remove.
- I like to make the dough in the morning and place it in the refrigerator before I go to bed. The reason is that the yeast has done most of its stuff during the day and the cold dough is much easier to work with in the morning.
- If you refrigerated the dough before forming it into a ball, then it’ll take longer to double in size because it needs to first come to room temperature.
- Make sure that the knob on the lid of your Dutch oven is rated for 450°F. The regular knob on my Le Creuset Dutch oven is only rated for 375°F. Therefore, I replaced it with a stainless steel knob.
I hope you liked this recipe for No-Knead Bread as much as I do. If so, please consider rating it and leaving a comment. Also, if you’d like to receive notifications of new posts by email, ever your email address in the Subscribe box.
Thank you so much for visiting Pudge Factor. I hope you’ll come back!
Recipe
Want to Save This Recipe?
Enter your email & I’ll send it to your inbox. Plus, enjoy weekly doses of culinary inspiration as a bonus!
By submitting this form, you consent to receive emails from Pudge Factor.
No Knead-Bread
Ingredients
- 3 cups (15 ¼-ounces) unbleached bread flour (See Tip 1)
- ¼ teaspoon yeast (See Tip 2)
- 1 ¼ teaspoon Kosher salt
- 1 ½ cups (12 ounces) filtered water (See Tip 3)
- vegetable oil for coating bowl
- extra flour for dusting
Instructions
- Mix all of the dry ingredients in a medium bowl. Add water and stir with a Danish dough whisk or wooden spoon until ingredients are incorporated, 30 seconds to 1 minute.
- Lightly coat the inside of a second medium bowl with vegetable oil and place the dough in the bowl. Cover the bowl with plastic wrap and let the dough rest 12 to 24 hours at room temperature. (See Tips 4 and 5)
- Remove the dough from the bowl to a piece of floured parchment paper and fold it over several times to form a ball. Place the dough seam side down on parchment paper. Cover with a clean dish towel and let it rise at room temperature until more than doubled in size, 2 to 3 hours. (See Tip 6)
- Preheat oven to 450°F. Place 7 ¼ quart (28 cm) covered Dutch oven in the oven at least 30 minutes prior to baking to preheat. (See Tip 7)
- Once the dough has more than doubled in volume, remove the pot from the oven, lift the dough on the parchment paper, and place the dough on the parchment paper into the pot. Cover with the lid and bake 30 minutes. Then remove the lid and bake uncovered for another 10 to 15 minutes, until the loaf is nicely browned.
- Yield: One 10-inch round loaf.
Video
Tips/Notes
- For best results, always weigh your flour. You'd be surprised at the variation in volume depending on how you measure the flour.
- Want it faster? Increase the yeast to 2 teaspoons. The dough will have risen the proper amount in around 2 hours. If you want the flavors to develop, refrigerate the dough for up to 3 days at this point.
- This works best with filtered water as opposed to tap water. Tap water contains chlorine which can retard the growth of the yeast and even kill the yeast.
- It's important to coat the bowl with vegetable oil. Otherwise, the dough will stick horribly to the bowl and be difficult to remove.
- I like to make the dough in the morning and place it in the refrigerator before I go to bed. The reason is that the yeast has done most of its stuff during the day and the cold dough is much easier to work with in the morning.
- If you refrigerated the dough before forming it into a ball, then it'll take longer to double in size because it needs to first come to room temperature.
- Make sure that the knob on the lid of your Dutch oven is rated for 450°F. The regular knob on my Le Creuset Dutch oven is only rated for 375°F. Therefore, I replaced it with a stainless steel knob.


Leave a Reply