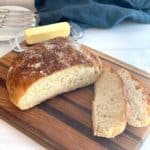
No Knead-Bread
No-Knead Bread is probably the easiest homemade bread you can imagine. It doesn’t require any special equipment like a stand mixer or bread machine and doesn’t involve the traditional 10 minutes or so of kneading – thus the name, no-knead! In fact, it only takes a couple of minutes to put the bread dough together.
Servings: 8 servings
Calories: 170kcal
Ingredients
- 3 cups (15 ¼-ounces) unbleached bread flour (See Tip 1)
- ¼ teaspoon yeast (See Tip 2)
- 1 ¼ teaspoon Kosher salt
- 1 ½ cups (12 ounces) filtered water (See Tip 3)
- vegetable oil for coating bowl
- extra flour for dusting
Instructions
- Mix all of the dry ingredients in a medium bowl. Add water and stir with a Danish dough whisk or wooden spoon until ingredients are incorporated, 30 seconds to 1 minute.
- Lightly coat the inside of a second medium bowl with vegetable oil and place the dough in the bowl. Cover the bowl with plastic wrap and let the dough rest 12 to 24 hours at room temperature. (See Tips 4 and 5)
- Remove the dough from the bowl to a piece of floured parchment paper and fold it over several times to form a ball. Place the dough seam side down on parchment paper. Cover with a clean dish towel and let it rise at room temperature until more than doubled in size, 2 to 3 hours. (See Tip 6)
- Preheat oven to 450°F. Place 7 ¼ quart (28 cm) covered Dutch oven in the oven at least 30 minutes prior to baking to preheat. (See Tip 7)
- Once the dough has more than doubled in volume, remove the pot from the oven, lift the dough on the parchment paper, and place the dough on the parchment paper into the pot. Cover with the lid and bake 30 minutes. Then remove the lid and bake uncovered for another 10 to 15 minutes, until the loaf is nicely browned.
- Yield: One 10-inch round loaf.
Video
Notes
- For best results, always weigh your flour. You'd be surprised at the variation in volume depending on how you measure the flour.
- Want it faster? Increase the yeast to 2 teaspoons. The dough will have risen the proper amount in around 2 hours. If you want the flavors to develop, refrigerate the dough for up to 3 days at this point.
- This works best with filtered water as opposed to tap water. Tap water contains chlorine which can retard the growth of the yeast and even kill the yeast.
- It's important to coat the bowl with vegetable oil. Otherwise, the dough will stick horribly to the bowl and be difficult to remove.
- I like to make the dough in the morning and place it in the refrigerator before I go to bed. The reason is that the yeast has done most of its stuff during the day and the cold dough is much easier to work with in the morning.
- If you refrigerated the dough before forming it into a ball, then it'll take longer to double in size because it needs to first come to room temperature.
- Make sure that the knob on the lid of your Dutch oven is rated for 450°F. The regular knob on my Le Creuset Dutch oven is only rated for 375°F. Therefore, I replaced it with a stainless steel knob.
Nutrition
Calories: 170kcal | Carbohydrates: 34g | Protein: 5g | Sodium: 366mg | Potassium: 46mg | Fiber: 1g | Calcium: 8mg | Iron: 0.4mg