
Looking for the best Easy Red Velvet Chocolate Chip Cookie recipe? You've found it! These bakery-style cookies deliver everything you love about red velvet cake-a soft and chewy texture with a hint of tangy goodness-but in cookie form. Perfect for holidays, Valentine's Day, or just a quick dessert, these are the red velvet cookies you need in your life.

Jump to:
Why You'll Want to Make Easy Red Velvet Chocolate Chip Cookies
- No Chill Time: Using melted butter eliminates the need to cream butter and sugar and reduces the chance of over-developing the gluten, meaning less waiting and no need to chill the dough.
- Perfect Texture: The combination of all-purpose and cake flour results in a delightfully soft, thick, and chewy cookie every time.
- The Signature Tang: A touch of white vinegar is added to the batter to ensure that classic, subtle tang that defines genuine red velvet flavor.
- Crowd-Pleaser: Their vibrant red color makes them a festive and eye-catching dessert, guaranteed to disappear quickly at any gathering.
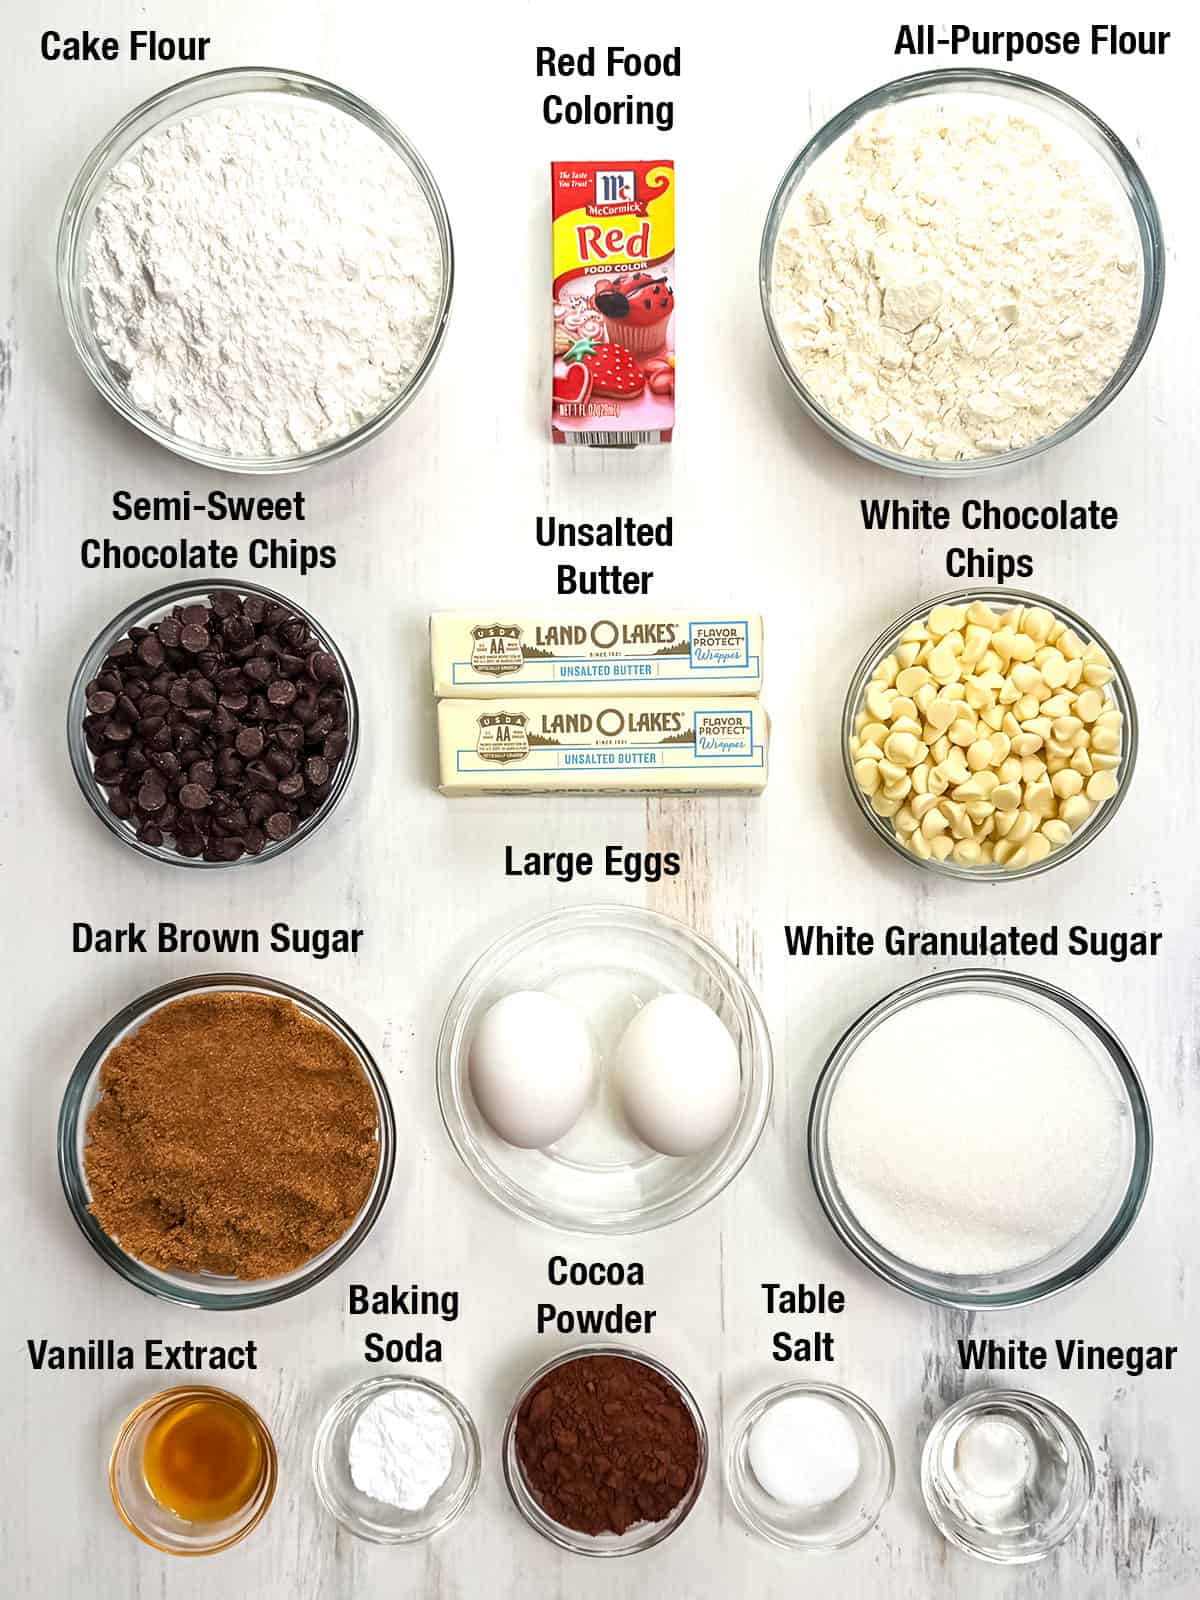
Ingredients - Here's What You'll Need
Steps to Make Easy Red Velvet Chocolate Chip Cookies
- Preheat oven to 350°F. Line four half-sheet pans with parchment paper and set aside until ready to use. Place the all-purpose flour, cake flour, baking soda, table salt, and cocoa powder in a medium-sized bowl.

- Then, use a whisk to combine all the dry ingredients. Set the bowl aside until ready to use.

- Place the unsalted butter in a large microwave-proof bowl. Heat in the microwave in 30-second intervals until the butter has melted, this will take about a minute. Add the dark brown sugar and white granulated sugar and use a whisk to combine.

- Next, add the vanilla extract and two large eggs, then whisk to combine.

- Add the white vinegar and red food coloring. Whisk until the mixture is well emulsified.

- Add the dry ingredients, about a cup at a time, to the wet ingredients. Use a silicone spatula to stir everything together until the dough forms.

- Next, stir in the semi-sweet and white chocolate chips.

- Use a two-tablespoon, or one-ounce, ice cream scoop to portion the dough. Place eight dough balls, about three inches apart, on each of the prepared baking pans. The last pan will only have four to five balls of dough. Bake the pans one at a time in a 350°F oven for 12 to 14 minutes.

- Remove the pan from the oven and place it on a wire cooling rack. Continue baking the rest of the pans one at a time.

- Allow the cookies to cool for about five minutes on the pans, then transfer them to a wire cooling rack. Store in an airtight container for up to five days.

These soft and chewy Ultimate Red Velvet Chocolate Chip Cookies are a guaranteed success for any baker, regardless of skill level. By following this easy, melted-butter method, you can quickly achieve that vibrant color and signature cocoa-vanilla flavor. Grab your ingredients and enjoy the best red velvet cookies you'll ever make.

Frequently Asked Questions
That classic tang comes from the chemical reaction between cocoa powder, baking soda, and a small amount of white vinegar used in the dough.
Using both flours creates the perfect soft and slightly dense texture. While you can use only all-purpose flour in a pinch, we highly recommend using the cake flour to achieve maximum softness and chewiness
Once cooled completely, store your cookies in an airtight container at room temperature. They will remain soft and delicious for up to five days.
Recipe Tips and Tricks
- Red Food Coloring Alternatives: Recently, the FDA banned Red 3 dye however, this ban does not go into effect until January 15, 2027. The McCormick Red Food Coloring that I used in this recipe, which is typically found in most supermarkets, unfortunately, does contain the banned ingredient. However, some red food colorings on the market do not contain the banned ingredient. Amazon sells a variety of natural food colorings, ranging from powder to gel to liquid. The one that I would recommend, that is closest to what I used in this recipe, is this Amazon Fresh Red Food coloring. You can also get plant-based food colorings at Whole Foods, which come in a pack of four colors.
- Sugar Swap: This recipe uses dark brown sugar for a richer, moister cookie. However, you can easily substitute light brown sugarinstead with minimal change to the final result.
- Visual Appeal: To make your cookies look professionally baked, slightly flatten the dough balls and press a few extra semi-sweet and white chocolate chips onto the top of the dough before baking.
- Baking Evenly: For best results, bake one pan at a time and allow the cookies to cool for five minutes on the pan before transferring them to a wire rack.
Other Great Red Velvet Recipes


Did you make this recipe? We'd love to know how it turned out! Leave a review below. Then, share a picture on Instagram and tag @pudgefactor so we can see it.
Don't forget to follow us on Pinterest, Facebook, YouTube, Flipboard, and Instagram.
Thank you so much for visiting PudgeFactor. We hope you'll come back!
Recipe
Want to Save This Recipe?
Enter your email & I'll send it to your inbox. Plus, enjoy weekly doses of culinary inspiration as a bonus!
By submitting this form, you consent to receive emails from Pudge Factor.

Easy Red Velvet Chocolate Chip Cookies
Equipment
- large microwave proof bowl
- medium size bowl
- whisk
- 4 half sheet pans
- Parchment paper
- wire cooling racks
Ingredients
- 1 c Unsalted Butter
- ¾ c White Granulated Sugar
- ¾ c Dark Brown Sugar1
- 1 tbs Vanilla Extract
- 2 Large Eggs
- 4 teaspoon Red Food Coloring2
- 2 teaspoon White Vinegar
- 1 ¾ c All-Purpose Flour
- 1 ¾ c Cake Flour
- 3 tbs Cocoa Powder
- 1 teaspoon Baking Soda
- 1 teaspoon Table Salt
- 5.5 oz Semi Sweet Chocolate Chips
- 5.5 oz White Chocolate Chips
Instructions
- Preheat oven to 350°F. Line four half-sheet pans with parchment paper and set aside until ready to use.
- Place the all-purpose flour, cake flour, baking soda, table salt, and cocoa powder in a medium bowl. Use a whisk to combine all the dry ingredients. Set the bowl aside until ready to use.
- Place the unsalted butter in a large microwave-proof bowl. Heat in the microwave in 30-second intervals until the butter has melted, about a minute. Add the dark brown sugar and white granulated sugar, then use a whisk to combine. Next, add the vanilla extract and two large eggs, whisking to combine. Add the white vinegar and red food coloring. Whisk until the mixture is well emulsified.
- Add the dry ingredients, about a cup at a time, and use a silicone spatula to stir them into the wet ingredients. Next, stir in the semi-sweet and white chocolate chips.
- Use a two tablespoon, or one ounce, ice cream scoop to portion the dough. Place eight dough balls, about three inches apart, on each of the prepared baking pans3, the last pan will only have four to five balls of dough. Bake the pans one at a time in a 350°F oven for 12 to 14 minutes.
- Remove the pan from the oven and place it on a wire cooling rack. Continue baking the rest of the pans one at a time. Allow the cookies to cool for about five minutes on the pans, then transfer them to a wire cooling rack. Store in an airtight container for up to five days.
- Yield 28 cookies
Tips/Notes
- In this recipe, I used dark brown sugar. however, you can substitute light brown sugar instead.
- Recently the FDA banned Red 3 dye however, this ban does not go into effect until January 15, 2027. The McCormick Red Food Coloring that I used in this recipe, and is what's typically found in most supermarkets, unfortunately does contain the banned ingredient. However, there are some red food colorings on the market that do not contain the banned ingredient. Amazon sells a variety of natural food colorings, ranging from powder to gel to liquid. The one that I would recommend, that is closest to what I used in this recipe, is this Amazon Fresh Red Food coloring. You can also get plant based food colorings at Whole Foods, but they come in a pack of four colors.
- To make the cookies a little more visually appealing, I slightly flattened the dough and placed a few semi sweet and white chocolate chips in the tops before baking.

Leave a Reply