
Learn how to poach an egg perfectly using one simple step - drain the loose whites first. No vortex, gadgets, or tricks needed.
Eggs naturally contain two types of whites:
- Thick white (albumen): stays close to the yolk
- Thin white: watery portion that disperses in how water
By removing the thin white first, the remaining egg holds together, producing a compact, neatly shaped poached egg, without any special techniques.
Quick Look at Technique
- Technique: Classic stovetop poached egg
- Key Tip: Drain off the loose egg white first
- Water temperature: Gentle simmer (not boiling)
- Cook Time: 4 to 5 minutes depending on the egg size
- Equipment: Small bowl, spoon, saucepan, slotted spoon
- Optional: Splash of vinegar
Jump to:
- Quick Look at Technique
- Why Poaching Eggs Can Be Frustrating
- Chula's Test Kitchen - What Actually Works
- What Happens Without Draining
- The Simple Fix: Drain the Watery White
- The Difference in the Pan
- How to Poach an Egg: Step-by-Step
- Common Mistakes when Poaching Eggs
- Choosing Eggs: What "Fresh" Really Means
- Frequently Asked Questions
- Chula's Test Kitchen
- Recipe
Why Poaching Eggs Can Be Frustrating
You want to make Eggs Benedict for a special brunch. But if you've ever tried to poach an egg at home, you've probably seen it happen. The whites spread into wispy strands, the shape becomes uneven, and what should be a simple technique turns into a bit of a mess.
Over the years, I've tried just about every suggested method - creating a vortex in the water, using silicone molds, microwaving, covering the pan, adding salt, and even using special pans.
Some of these techniques can work under certain conditions, but none made as much consistent difference as one simple step.
The easiest way to make perfect poached eggs every time is to drain off the loose whites before cooking.
Chula's Test Kitchen - What Actually Works
To test this method, I cooked two eggs side-by-side:
- Same carton
- Same pan
- Same amount of water and vinegar
- Same cooking time
The only difference was draining the loose whites from one egg before cooking.
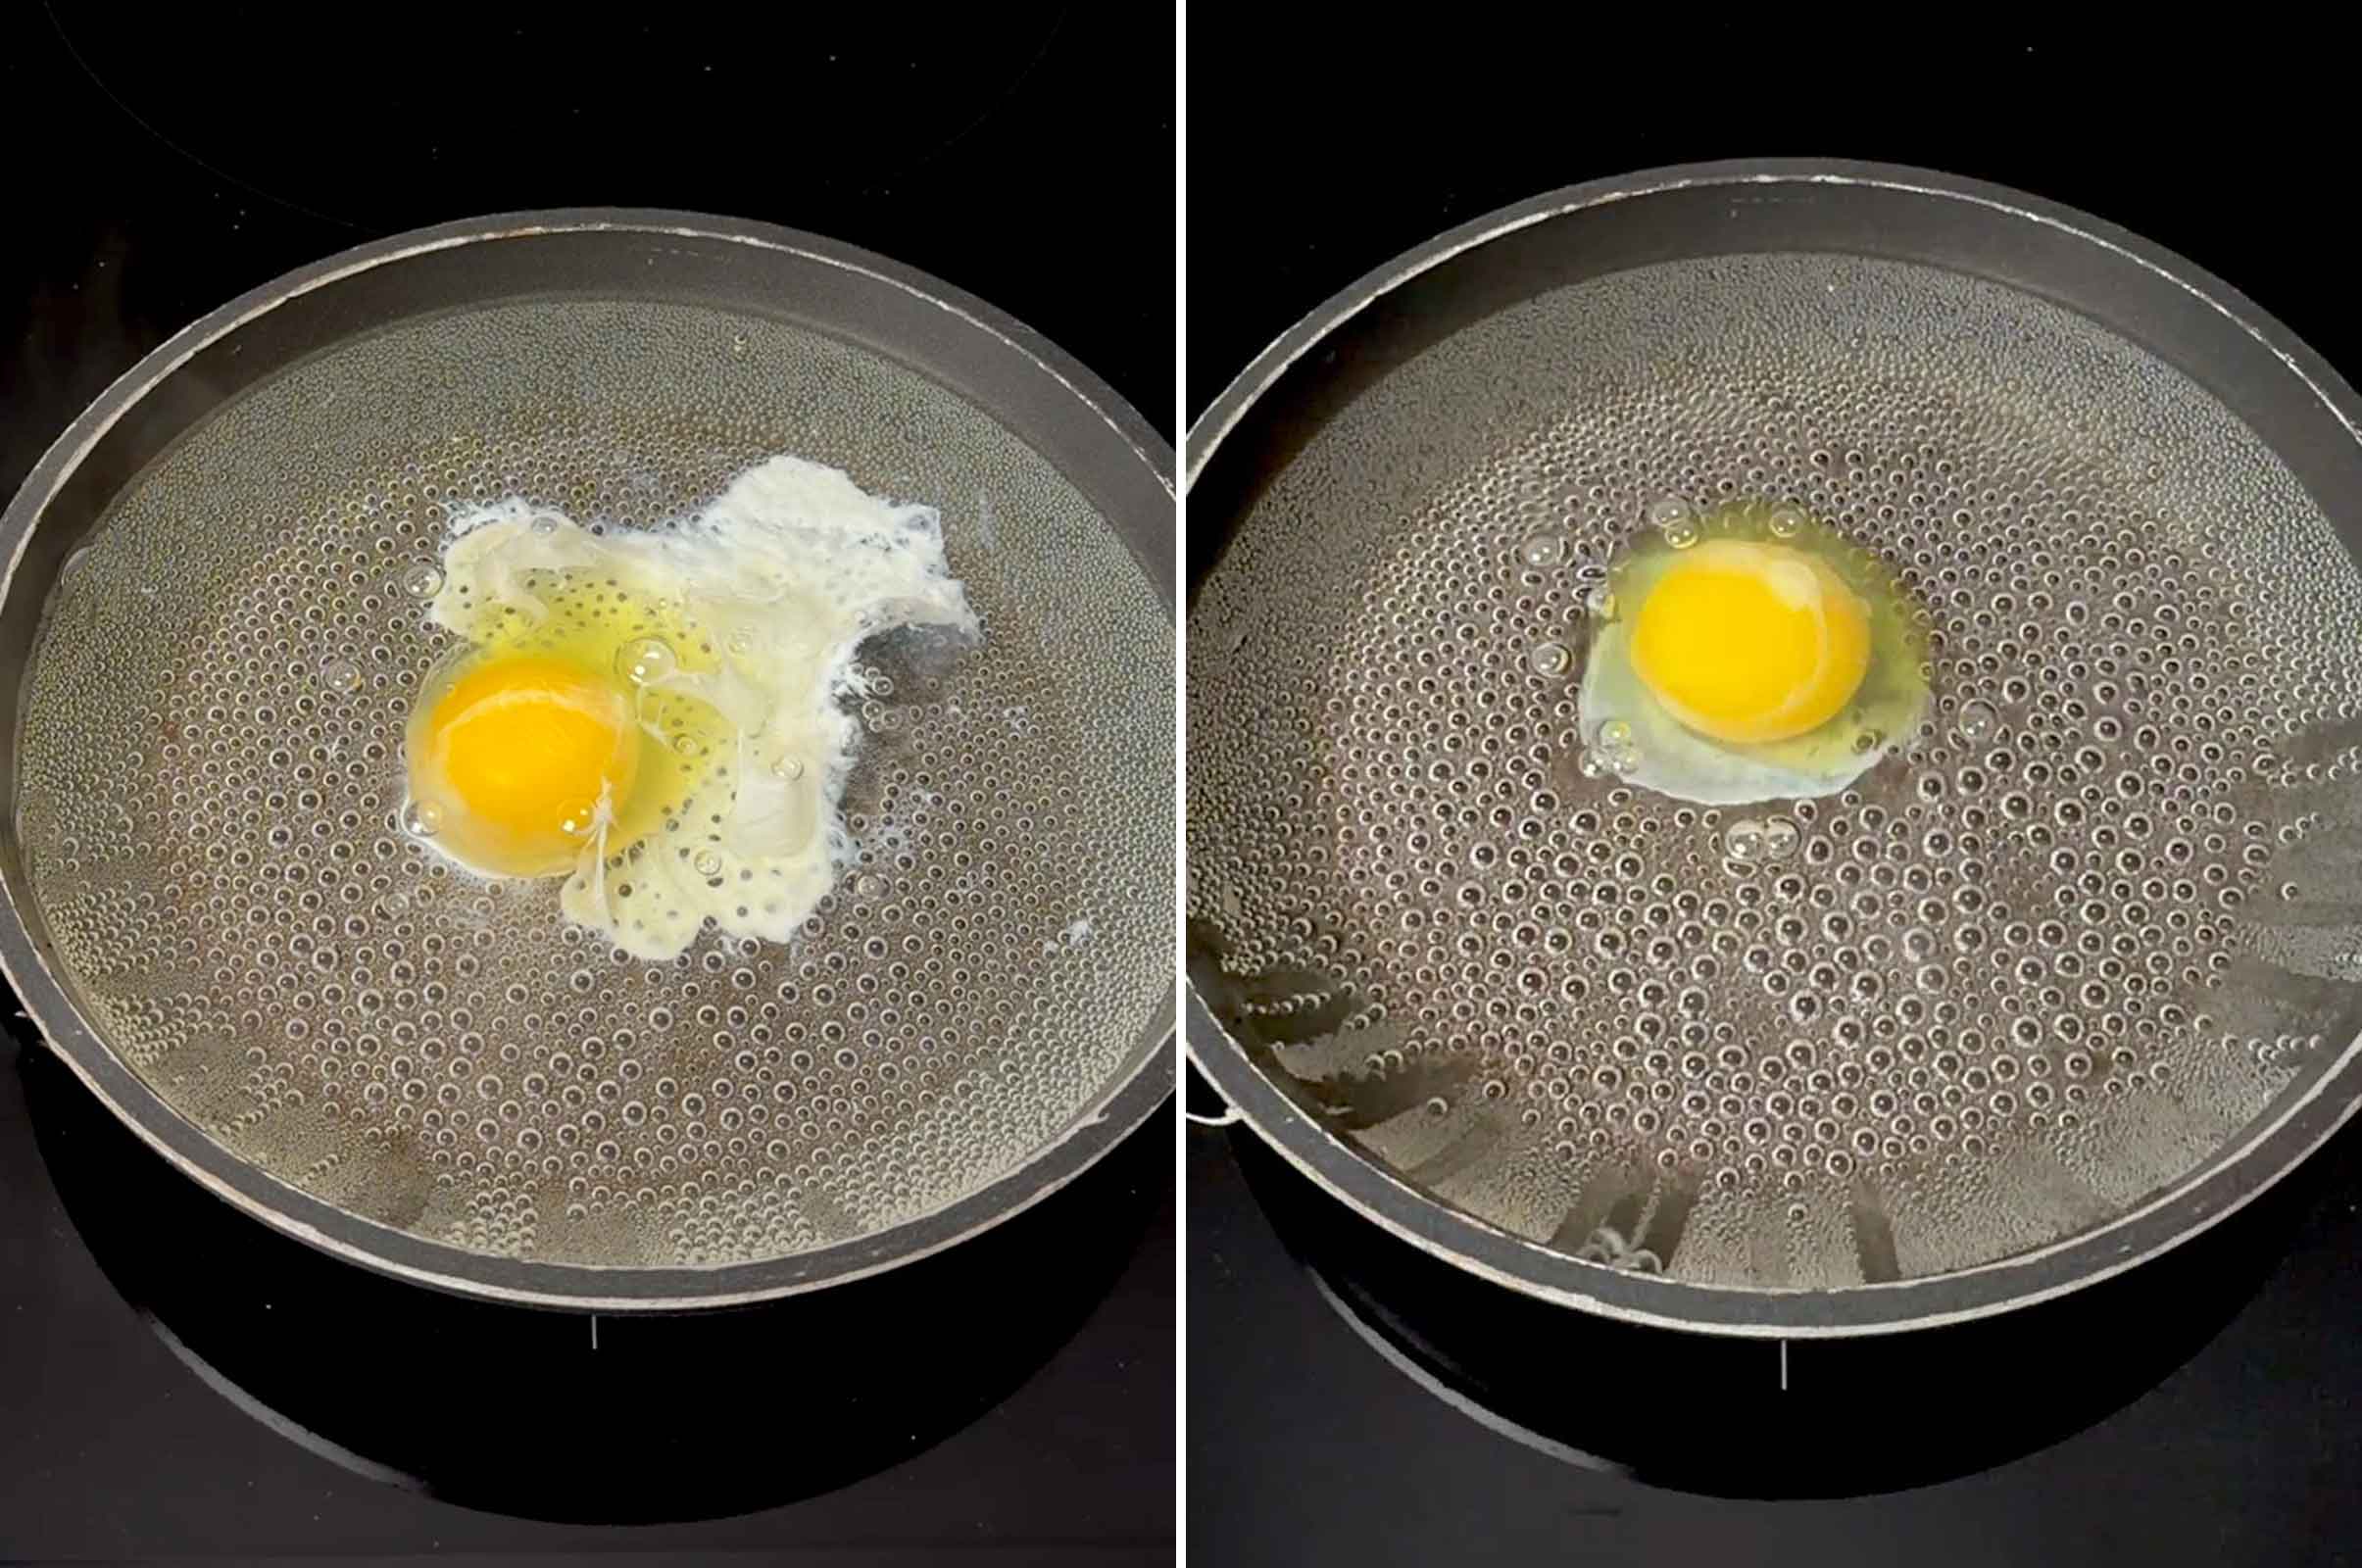
The result was clear: The drained egg held its shape beautifully, while the undrained egg produced whispy strands that required significant trimming but still left a jagged egg.
What Happens Without Draining
When the undrained egg is added directly to the water:
- Loose whites spread outward
- Wispy strands form
- The egg loses its shape
Even after trimming away the wispy cooked whites, the final egg is still less compact.
The Simple Fix: Drain the Watery White
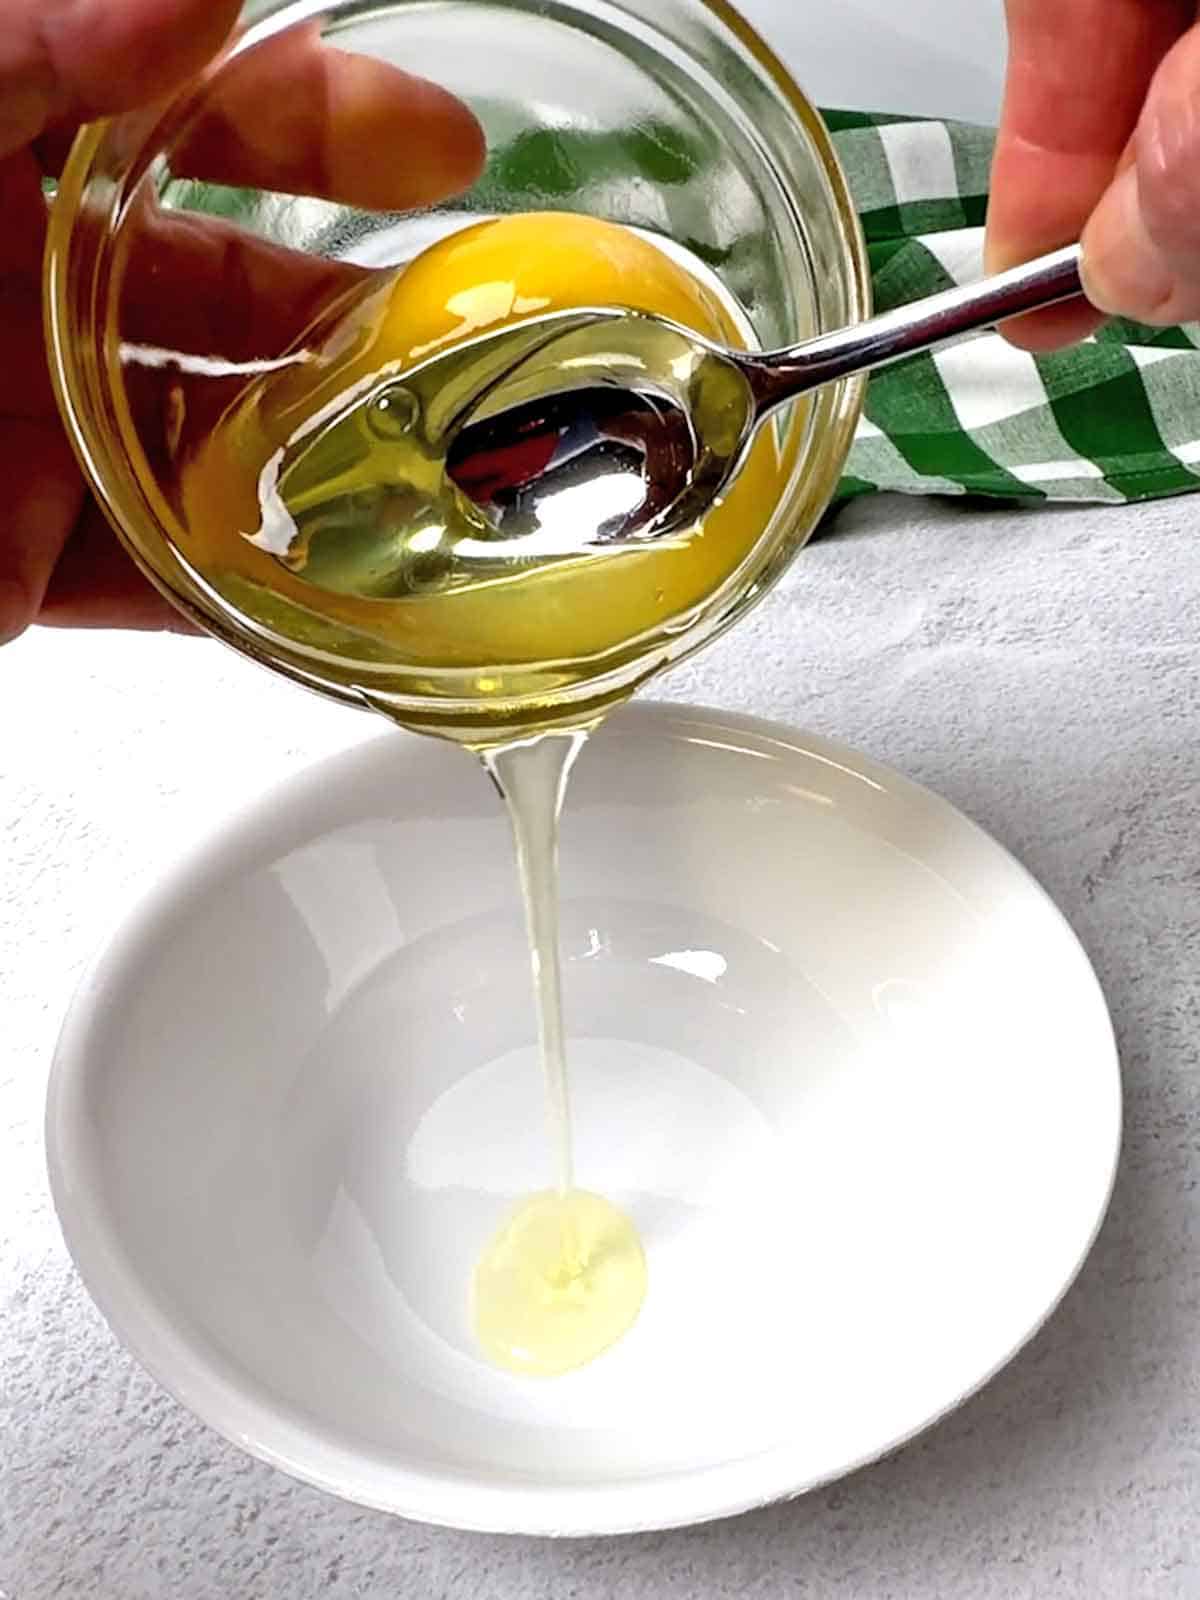
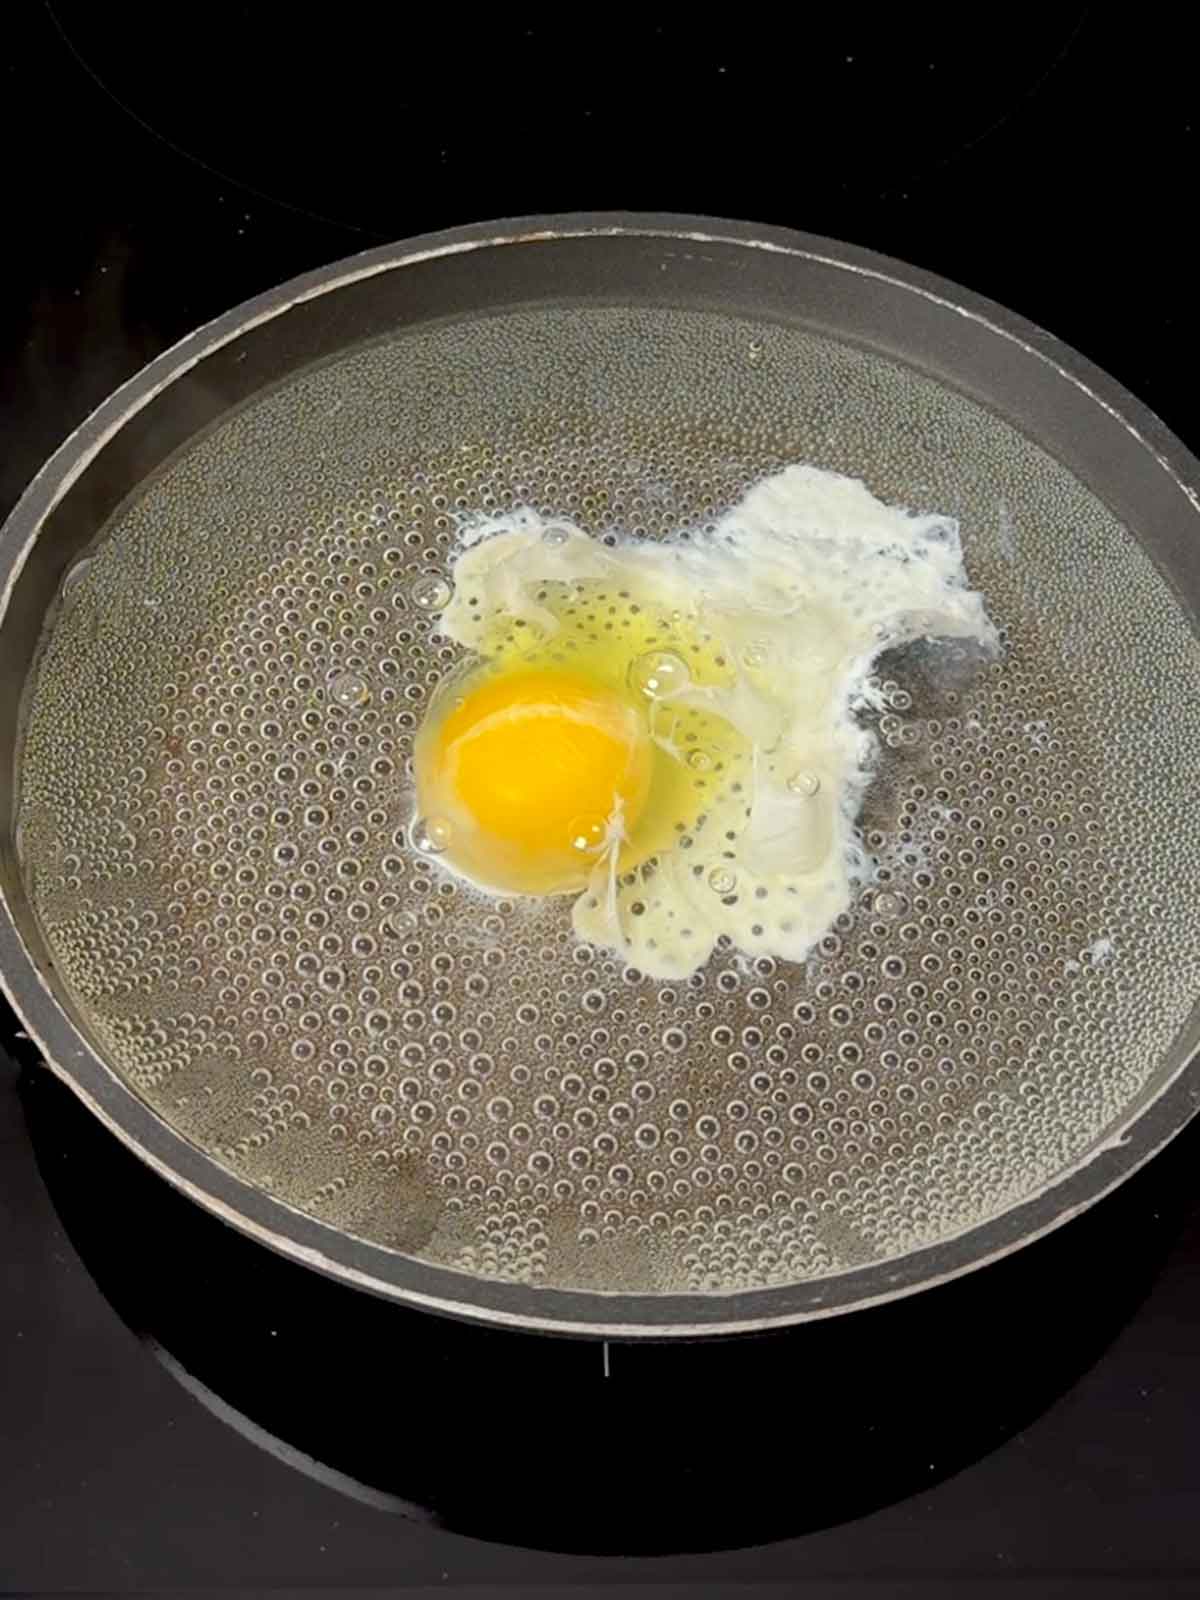
Crack the egg into a small bowl. Gently tilt it, allowing the water portion of the white to drain off.
The thicker white and yolk remain intact.
The Difference in the Pan
How to Poach an Egg: Step-by-Step
- Bring a saucepan with about an inch of water to a gentle simmer.
- Add about a tablespoon of white vinegar (optional).
- Crack the egg into a small bowl.
- Using the back of a teaspoon drain off the loose watery white.
- Gently slide the egg into the simmering water.
- Cook the egg, undisturbed, for 2 ½ minutes.
- Carefully flip the egg and cook for an additional 2 minutes.
- Remove with a slotted spoon and drain.
Common Mistakes when Poaching Eggs
- Not Draining the Loose Whites: This is the biggest cause of messy poached eggs. Removing the thin white makes all the difference.
- Using Water That's Too Hot: A rolling boil will break the egg apart. Keep the water at a gentle simmer (small bubbles forming at the bottom of the pan).
- Dropping the Egg Directly into the Pan: Crack the egg into a bowl first for better control, and to drain the loose whites.
- Overhandling the Egg: Let the egg set before touching it. Too much movement can cause it to fall apart.
- Focusing on Gimmicks Instead of Techniques: Vortexes, molds, and other tricks might work, but they're not necessary, and often produce inconsistent results.
Choosing Eggs: What "Fresh" Really Means
Fresh eggs generally produce better poached eggs because they contain less loose, watery white.
One way to gauge the freshness is by checking the Julian date on the carton - the three-digit number that represents the day of the year the eggs were packed. It's the only way I purchase eggs. In fact, I have an app on my iPhone that tells me the Julian date!
- 001 = January 1
- 064 = March 5
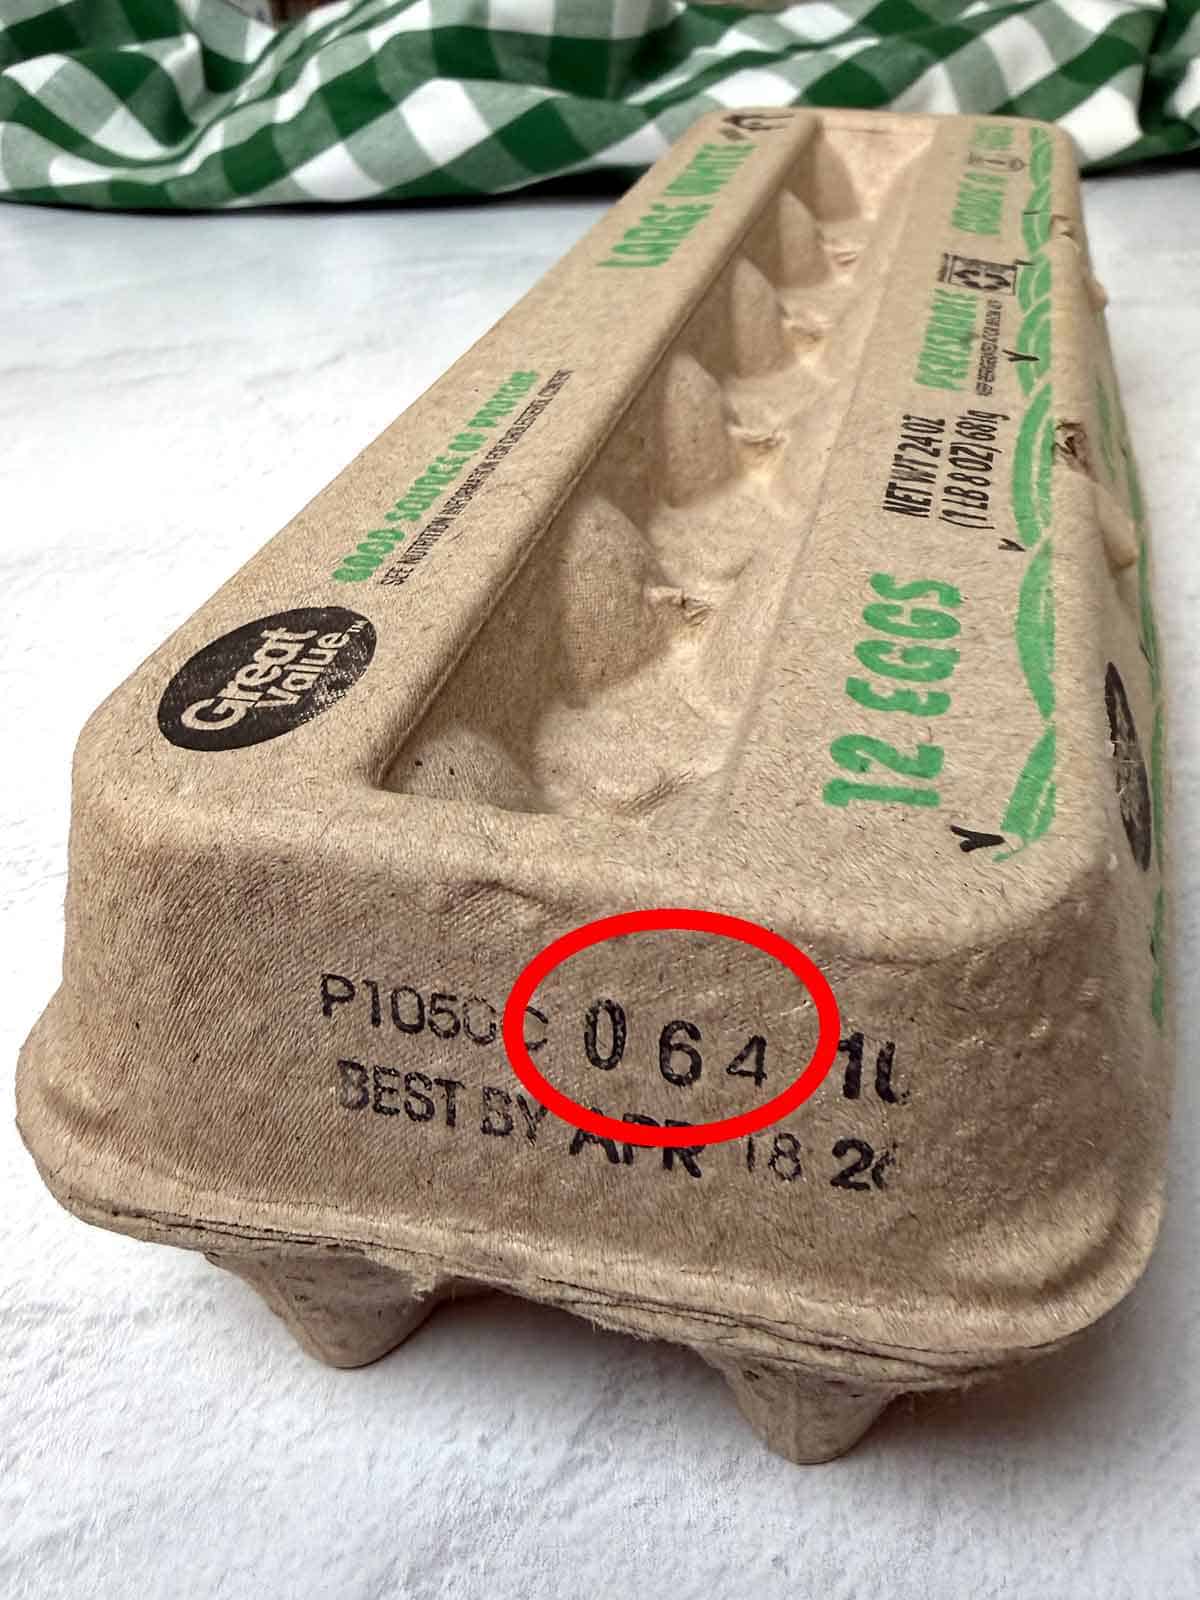
A higher number usually means eggs packed more recently.
In practice, however, freshness can vary more than the carton suggests.
- Eggs may be handled differently before reaching the store.
- Cartons can be opened and eggs replaced.
- Storage conditions can affect quality
Because of this, even recently packed eggs can sometimes have more loose whites than expected. Draining the loose whites helps produce consistent results, regardless of freshness.
Frequently Asked Questions
Vinegar helps the whites set slightly faster, but it's not essential
No. Draining the loose white from the egg achieves the same effect more simply and more consistently.
I poach my large eggs straight from the refrigerator for 2 ½ minutes, then flip and poach for 2 additional minutes. Times, however, will vary depending on the size of the eggs.
The thin, watery egg whites spread in the water before they can set. Draining solves this.
I've tried using a wire mesh strainer, with no luck. I add the egg, and the loose white does not drain. Perhaps my strainer is too fine a mesh. For my technique, all I need is a small bowl to crack the egg and a teaspoon to hold the egg back while draining the loose liquid.
Chula's Test Kitchen
In Chula's Test Kitchen, I test techniques side-by-side to see what actually works.
For this method, I cooked two eggs from the same carton in the same pan, with the same water and time. The only difference was draining the loose whites from one egg before cooking.
The drained egg consistently produced a more compact, better-shaped poached egg, regardless of age, without any extra steps or special equipment.
Did you make this recipe? We'd love to know how it turned out! Leave a review below. Then, share a picture on Instagram and tag @pudgefactor so we can see it.
Don't forget to follow us on Pinterest, Facebook, YouTube, Flipboard, and Instagram.
Thank you so much for visiting PudgeFactor. We hope you'll come back!
Recipe
Want to Save This Recipe?
Enter your email & I'll send it to your inbox. Plus, enjoy weekly doses of culinary inspiration as a bonus!
By submitting this form, you consent to receive emails from Pudge Factor.

How to Poach an Egg Perfectly - No Gimmicks Required
Equipment
- 7 inch nonstick skillet
- Small Bowl
- teaspoon
- OXO Good Grips Small Flip and Fold Silicone Omlet Turner
- slotted spoon
Ingredients
- 1 large egg
- water
- 1 Tablespoon white vinegar (optional)
Instructions
- Crack the egg into a small bowl. Use the back of a spoon to hold the egg, then carefully tip the bowl to let the loose white drain off.
- Fill the skillet with 1 inch of water and add the vinegar (See Tip 1)
- Heat the water to a simmer and add the egg. Lower the heat to maintain the simmer - do not boil. (See Tip 2)
- Allow the egg to cook, undisturbed, for 2 ½ minutes. Carefully flip the egg and cook for an additional 2 minutes. (See Tip 3)
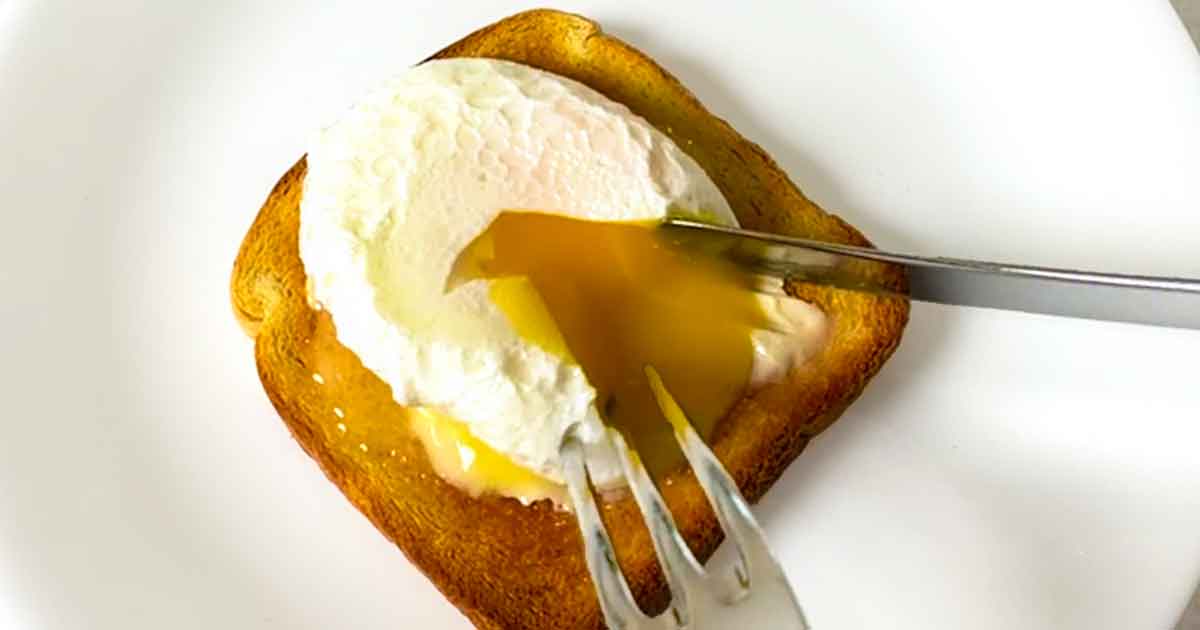
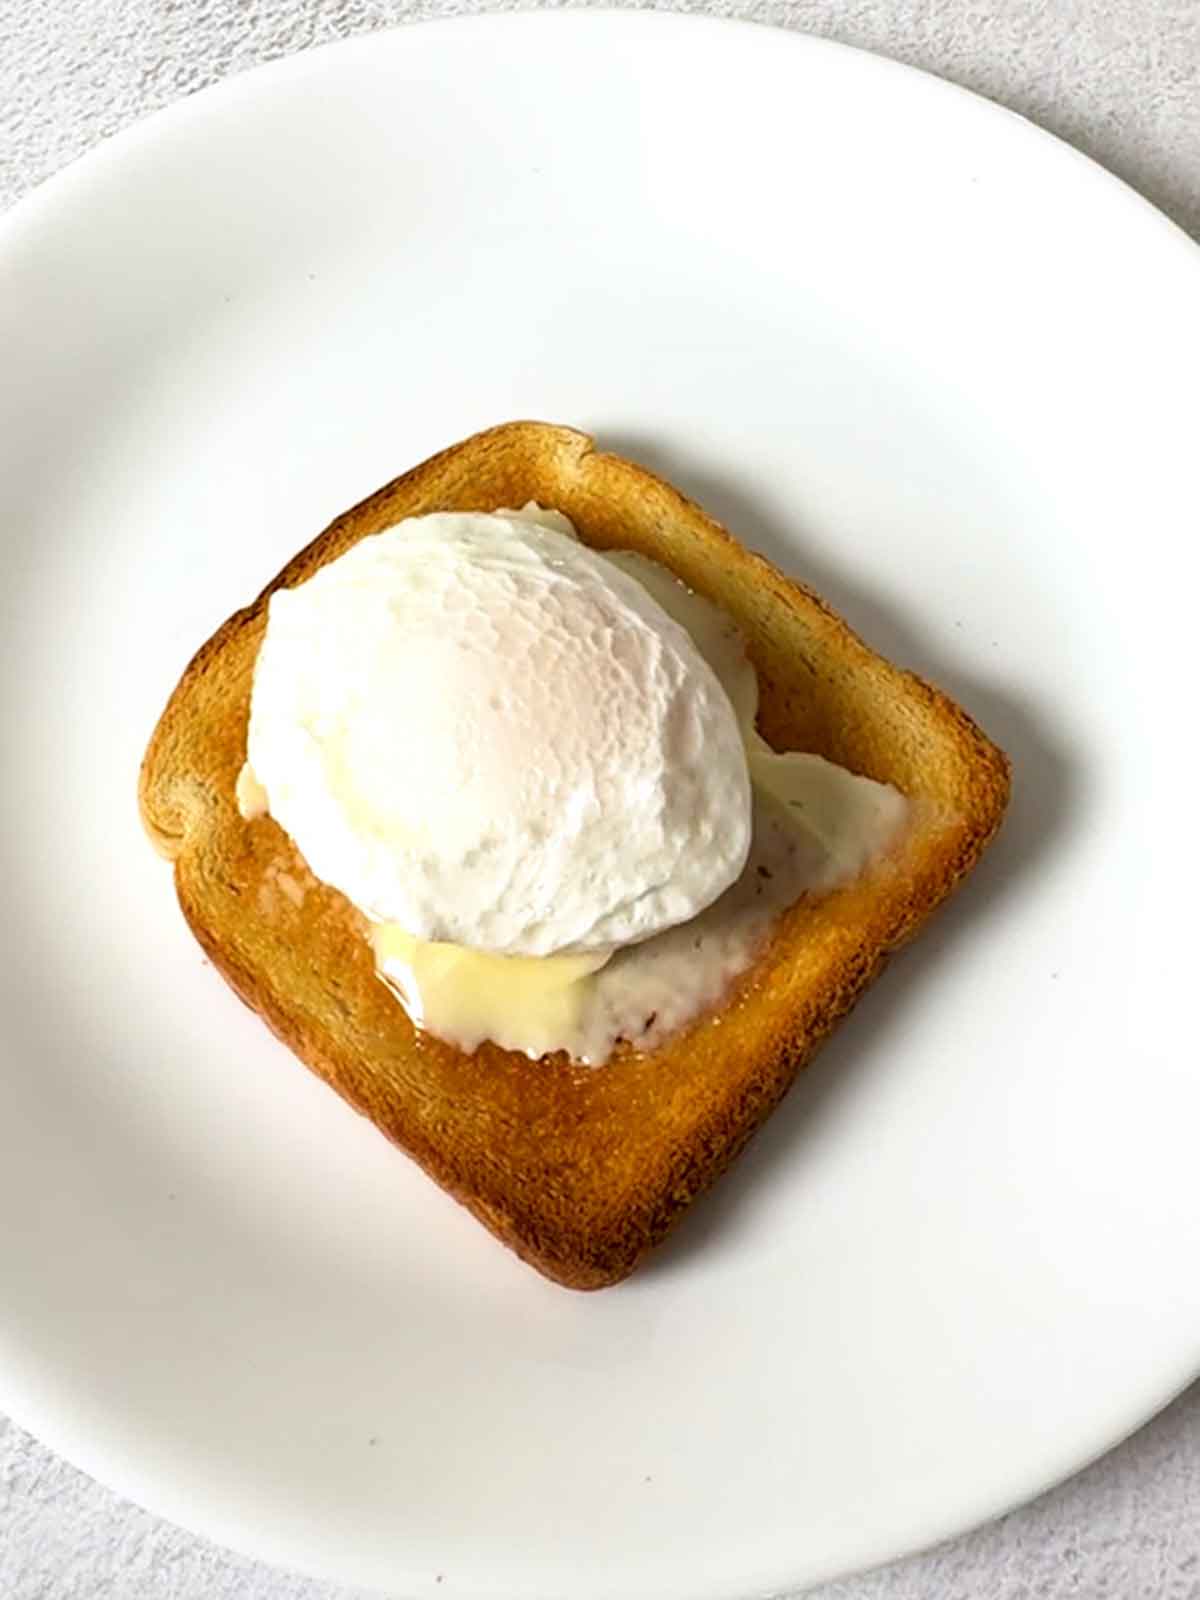
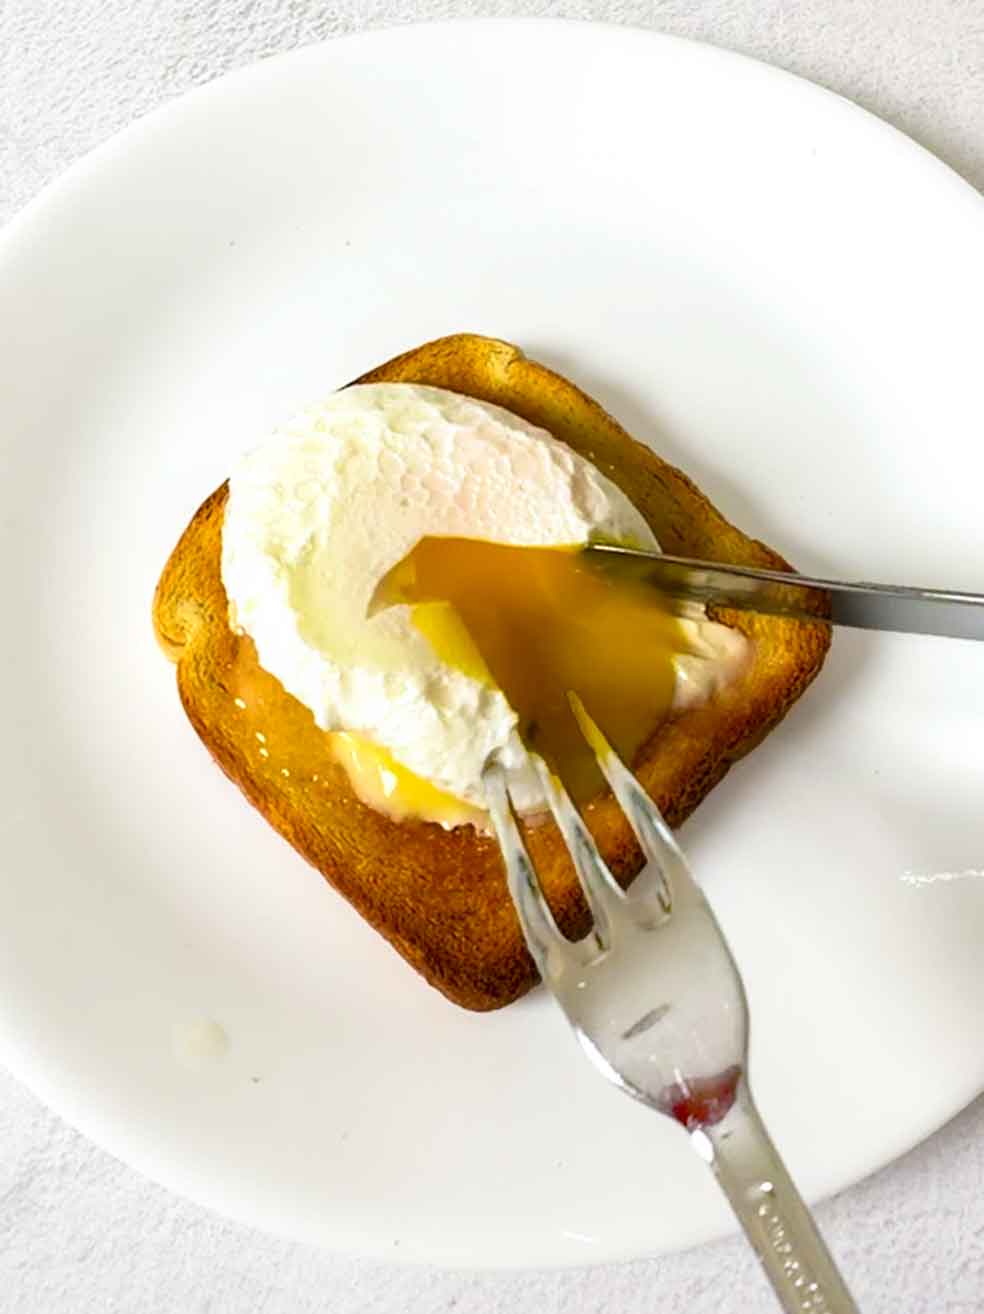
- Carefully remove the egg with a slotted spoon, allowing the water to drain. Place on a piece of buttered toast, and enjoy.
Video
Tips/Notes
- For my 7-inch skillet, I used 2 cups of water.
- For a simmer, you should see small bubbles forming at the bottom of the pan.
- I used my OXO Good Grips Small Flip and Fold Silicone Omelet Turner - it was perfect!


Leave a Reply