
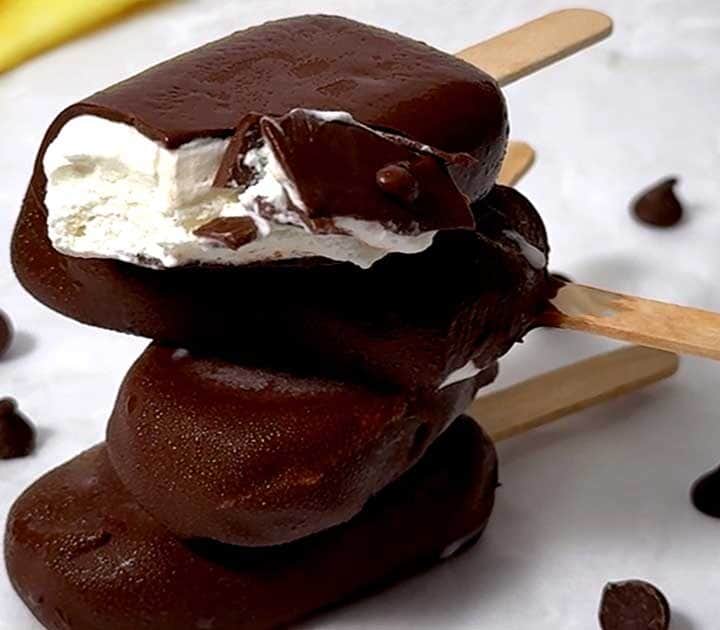
If you're searching for the perfect summer treat that's both rich and secretly healthy, these Creamy Chocolate Cottage Cheese Fudgesicles are for you! These homemade chocolate fudgesicles are velvety smooth, deeply chocolatey, and packed with protein thanks to the cottage cheese base.

Whether you're looking to beat the heat or want a guilt-free dessert, these high-protein chocolate popsicles are about to become your new go-to recipe. The best part? No one will ever guess the secret ingredient is cottage cheese!
Jump to:
The Experiments
On my first attempt at making these healthy fudgesicles, I used my blender. I knew that the mixture would be thick, and without thinking, I added the ingredients in the incorrect order - cocoa powder, cottage cheese, etc. This was a disaster. Even with my powerful blender, the ingredients never fully blended together.
On my second attempt, I decided to use light corn syrup in place of the honey, order the ingredients in the blender differently, and add some heavy cream to help thin out the mixture. Although this worked well for blending, the taste was not very good because the level of sweetness in the light corn syrup was much lower than with honey.
In both of these attempts, I used regular unsweetened cocoa.
On this final attempt, I switched to my food processor and used Dutch-process cocoa, along with honey sweetened fudgesicles came out perfect. Dutch-process cocoa has a milder, smoother, and less acidic taste compared to regular unsweetened cocoa. Some recipes suggest using maple syrup, but since I'm not a fan of maple syrup, I bypassed that option.
Success with this final attempt!
Ingredients - Here's What I Used

Steps to Make the Chocolate Cottage Cheese Fudgesicles
- I started by adding the ingredients to my food processor, using a steel blade, in the following order: cottage cheese, cocoa, salt, cream, vanilla, and honey. I pulsed the food processor ten times to start to combine the ingredients.

- I scraped down the sides of the food processor, and thought that the mixture looked too thick. I had started with two tablespoons of heavy cream and decided to add another two tablespoons.

- I continued processing the mixture for about 20 seconds, until it was smooth and creamy.

- Because the mixture was still pretty thick, the easiest way to transfer it to the popsicle mold was to use a piping bag. Therefore, I transferred the mixture to a piping bag that I had set in a glass. You could also use a Ziploc bag here.

- I snipped the end of the piping bag and piped the mixture into my popsicle molds.

- Once I had filled the molds, I took each one and tapped it on the countertop to minimize the air bubbles in the mixture.

- Finally, I inserted the sticks into the filled molds. I refrigerated the chocolate cottage cheese fudgesicles for at least 4 hours to ensure that they were fully set.

Removing the Fudgesicles from the Molds
The best way to remove the fudgesicles from the molds is to dip them in hot water for 30 seconds after removing them from the freezer.

After 30 seconds, the fudgesicles slipped right out of the molds!

Who knew that something as simple as cottage cheese could transform into such a decadent, creamy chocolate treat? These homemade chocolate fudgesicles prove that healthy desserts can taste just as delicious as store-bought favorites.
With just a ingredients, you'll have a protein-packed summer treat that everyone will love, and no ice cream maker needed! Yum!

Frequently Asked Questions
Once blended, the cottage cheese becomes ultra-creamy and takes on the flavor of chocolate. Even the kids won't notice it's there.
I tried light corn syrup, but it was not nearly as sweet as the honey, and the result was a bitter taste from the unsweetened chocolate. Some recipes will suggest maple syrup or agave nectar. However, in my experimentation, I didn't try either of these options, so I don't know whether they would work or not.
Full-fat cottage cheese will produce the creamiest fudgesicles, followed by 2% cottage cheese. Low-fat cottage cheese could be used, but the fudgesicles will likely be a touch icy because of the water content.
I tried both regular and Dutch-process cocoa and prefer the Dutch-process because of the deeper and milder chocolate taste. However, regular unsweetened cocoa also works.
Recipe Tips and Tricks
- I tried using both a blender and a food processor with a steel blade. For me, the food processor was the better option because of the mixture's thickness. The food processor, however, required additional processing to achieve a silky smooth and creamy texture.
- Always unmold straight from the freezer by dipping in hot water for 30 seconds. Don't let fudgesicles sit at room temperature first. The reason, which I learned the hard way, is that the sticks will either slip out first, or the fudgesicles will melt too much and be a mess.
- When I first started experimenting with this recipe, I tried making chocolate butter pecan cottage cheese ice cream. The result was delicious! Based on this, you might consider adding either toasted pecans or mini chocolate chips to the fudgesicle mixture.
- Make sure the fudgesicles are fully set with at least four hours in the freezer before attempting to unmold them.
Other Delicious Cottage Cheese-Based Recipes
Using cottage cheese in recipes is quite trendy now. Here are some recipes I've made using cottage cheese that were delicious.


Did you make this recipe? We'd love to know how it turned out! Leave a review below. Then, share a picture on Instagram and tag @pudgefactor so we can see it.
Don't forget to follow us on Pinterest, Facebook, YouTube, Flipboard, and Instagram.
Thank you so much for visiting PudgeFactor. We hope you'll come back!
Recipe
Want to Save This Recipe?
Enter your email & I'll send it to your inbox. Plus, enjoy weekly doses of culinary inspiration as a bonus!
By submitting this form, you consent to receive emails from Pudge Factor.

Creamy Chocolate Cottage Cheese Fudgesicles
Equipment
- Popsicle molds (See Tip 1)
- Food Processor with steel blade (See Tip 2)
Ingredients
- 2 cups (16 ounces, 454 grams) 4% cottage cheese (See Tip 3)
- 6 Tablespoons (1.125 ounces 32 grams), Dutch process unsweetened cocoa (See Tip 4)
- ¼ teaspoon Kosher salt
- ¼ cup (2 ounces, 57 grams) heavy cream (See Tip 5)
- 1 teaspoon vanilla extract
- ½ cup (6 ounces, 170 grams) honey
Instructions
- Add all ingredients to the bowl of a food processor with a steel blade. Secure the top and pulse ten times to incorporate the ingredients. Use a silicone spatula to scrape down the sides. Process for an additional 20 to 30 seconds or until silky, creamy smooth.
- Transfer mixture to a piping bag or Ziploc bag. Snip off the end or corner and pipe mixture into the popsicle molds, making sure not to overfill.
- Take each filled mold and tap it on the countertop to help eliminate any air bubbles. Insert the popsicle sticks.
- Freeze for at least four hours.
- To remove the fudgesicles, dip the molds, straight from the freezer in hot water for 30 seconds. (See Tip 6)
- Yield: 6 Chocolate Cottage Cheese Fudgesicles.
Video
Tips/Notes
- My popsicle molds hold three ounces each of the mixture and produce six fudgesicles. Different popsicle molds will likely have different capacities. Measure the capacity of your popsicle molds.
- You can also use a blender for this recipe, but due to the consistency of the mixture, a food processor is preferable.
- I prefer to use 4% cottage cheese because of its rich, creamy texture. You could also use 2% cottage cheese or low-fat cottage cheese. The fudgesicles, however, will not be quite as creamy, and could be a bit icy with the low-fat cottage cheese.
- I've tried both regular and Dutch-processed cocoa in this recipe, and I prefer the Dutch-processed because of its deeper, milder taste. However, regular unsweetened cocoa will also work.
- The heavy cream helps thin the mixture, making it more manageable. You can also use half-and-half or whole milk.
- Don't try to unmold the fudgesicles by leaving the molds out of the freezer. You'll end up with a mess on your hands. Use the hot water method for best results.


Leave a Reply