
You're in the right place if you've ever dreamed of serving a perfectly cooked rib roast that could rival a fine steakhouse. A rib roast is more than just a meal-it's an experience that leaves your guests raving long after the plates are cleared. And guess what? It's surprisingly simple to master. With just a handful of ingredients and a little know-how, you can create a juicy, flavorful roast as elegant as it is delicious. Let's dive in!
I've been making rib roast using this simple recipe for as long as I can remember. The only time I screwed up was when I tried making the roast in the microwave before I understood how the microwave worked - a huge mistake!
Jump to:
Why You'll Love This Recipe
- Minimal Ingredients: You only need a rib roast, kosher salt, and freshly ground black pepper.

- Effortlessly Elegant: The roast's natural flavor shines with this straightforward method.
- Perfect for Gatherings: Its impressive appearance and rich taste make it a crowd-pleaser.
- Delicious Leftovers: Slice the leftover roast with the 3 mm blade on your food processor for amazing sliders.
How to Buy
I purchased the roast at a local grocery store when it was on sale - a huge sale!
A plus was that the roast was packaged with rib bones cut away from the actual roast, but tied back on with butcher twine. This provided the same bone-in benefits without the hassle of the bones when carving the roast. More about that in a minute.
Simple Preparation
- Allow to Come to Room Temperature: I removed the roast from the refrigerator 3 to 4 hours before cooking. This allowed the fat and muscles to relax somewhat, ensuring more even heat penetration.
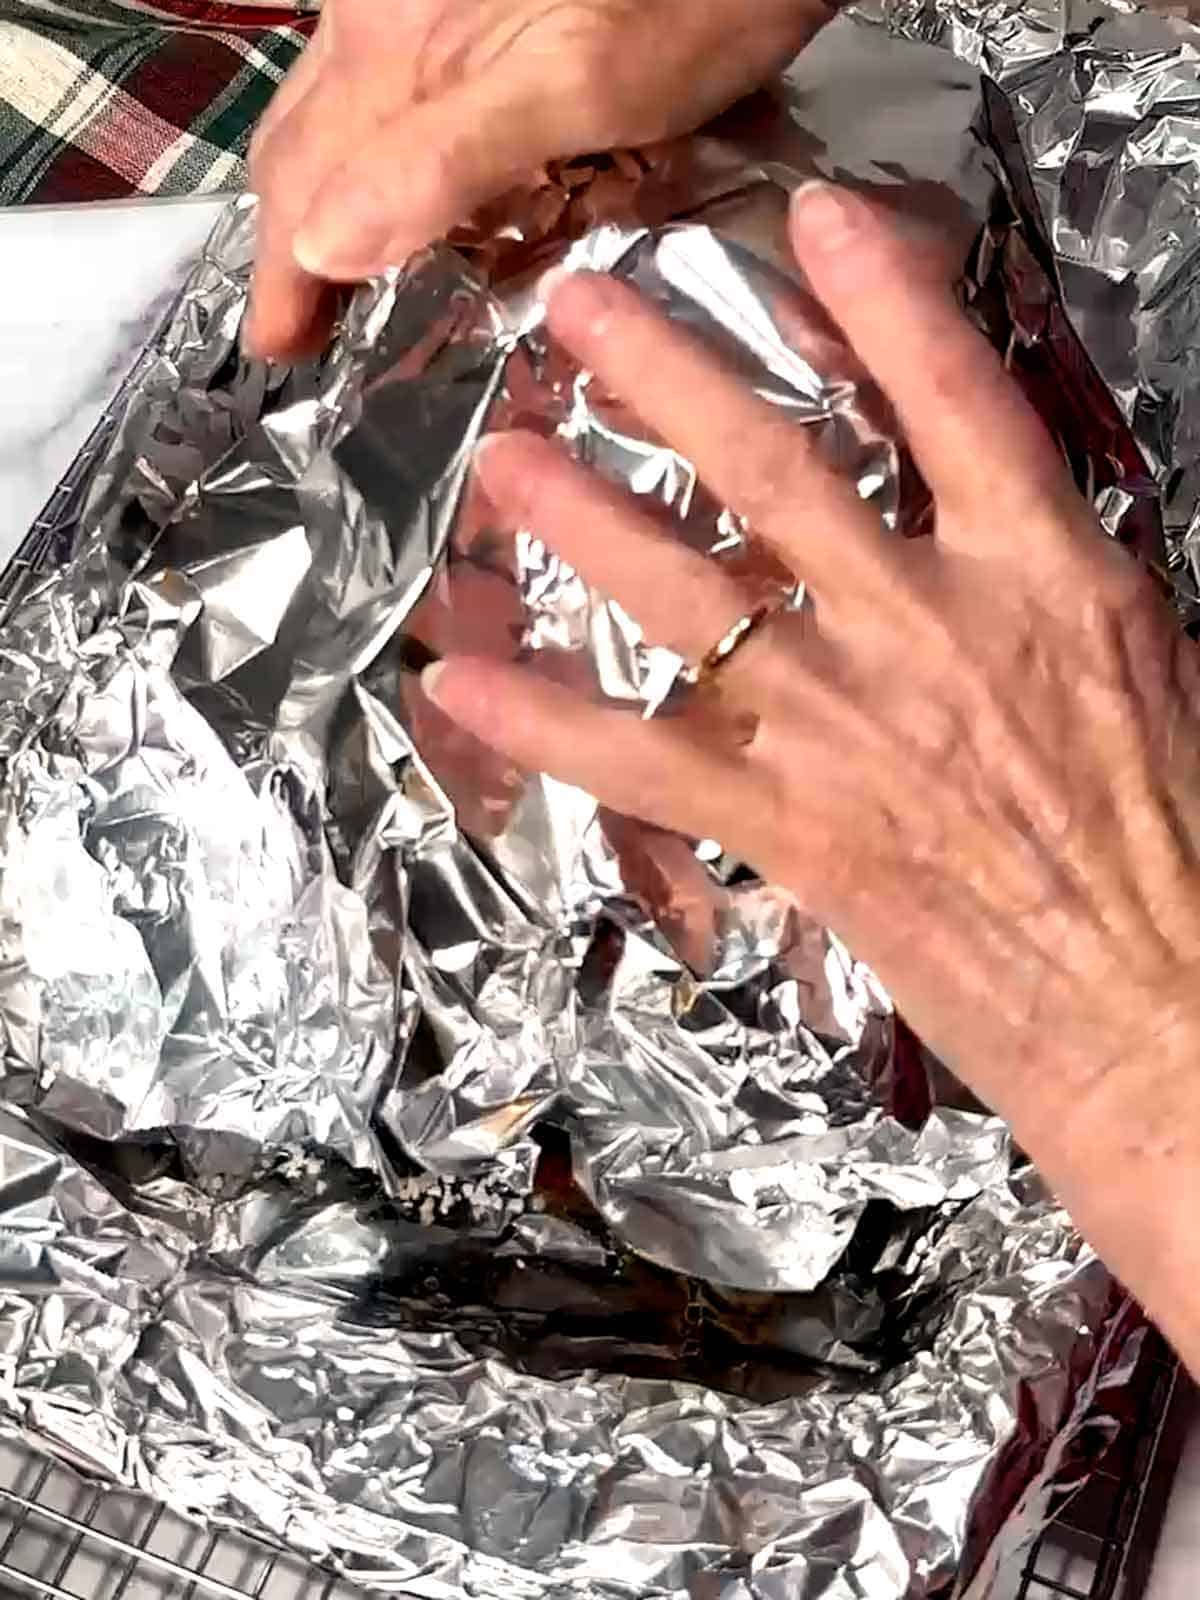
- Minimize Cleanup: I cook my rib roast in a vintage Corning Ware roasting pan with a rack. Before inserting the rack, I lined the roasting pan with heavy-duty aluminum foil. The purpose of the aluminum foil was to minimize the cleanup!

- Minimize Oven Mess: Then, I covered the rack with another piece of aluminum foil, poked holes in it with a fork, and let the grease from the cooking roast seep into the bottom of the roasting pan, minimizing the oven mess and smoke.

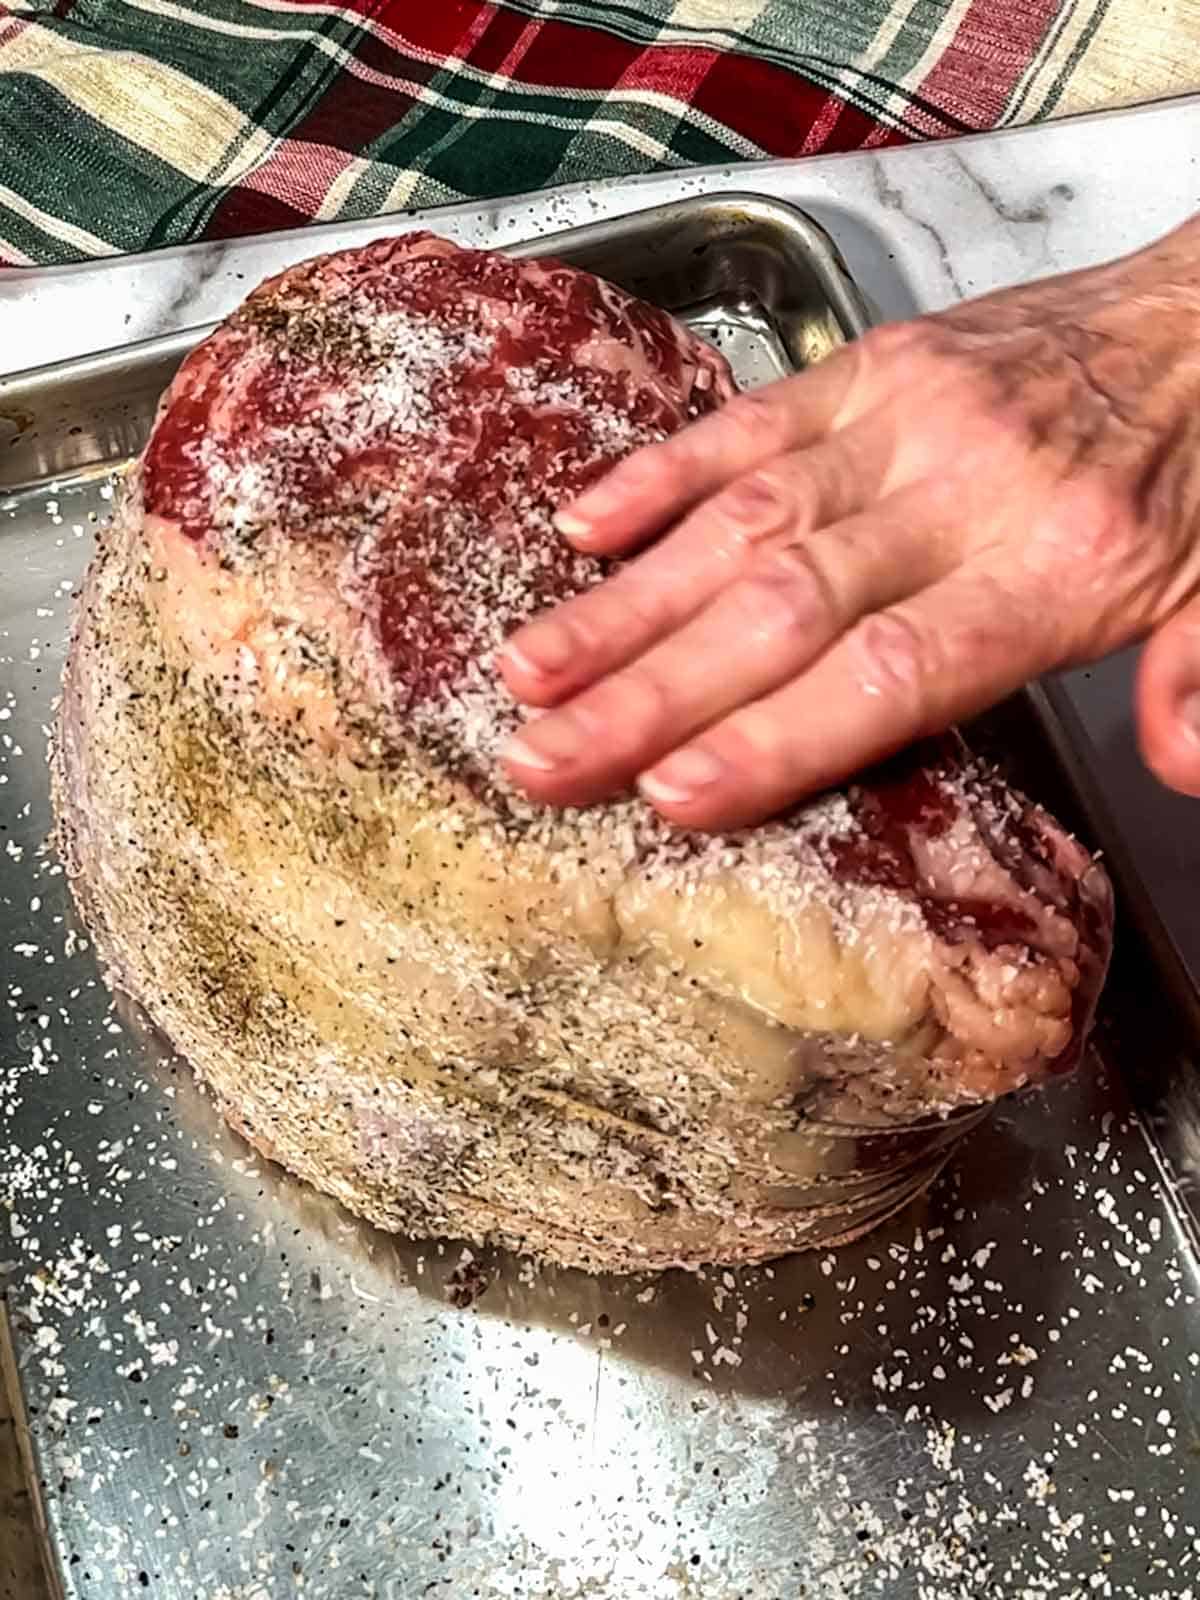
- Season: Before I was ready to cook the roast, I patted it dry with paper towels. Then I liberally sprinkled Kosher salt and black pepper on top and sides, rubbing it into the roast with my hand.
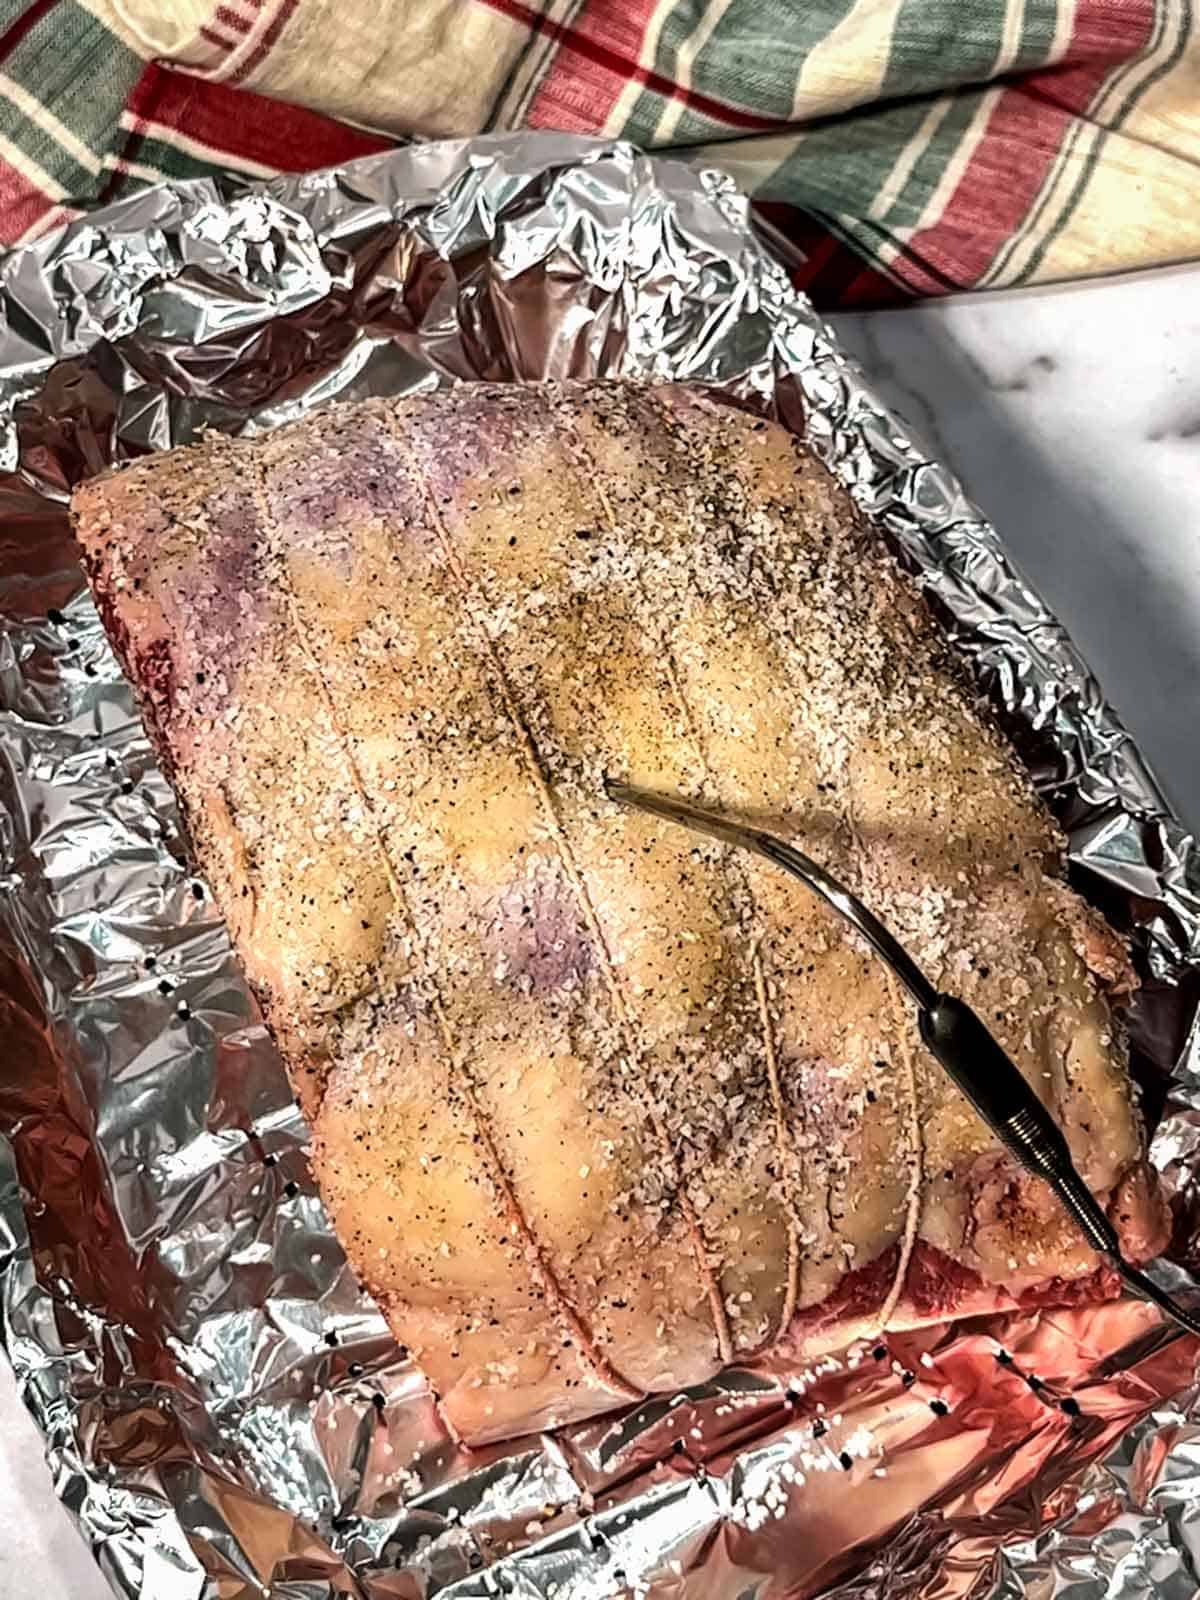
- Measure its Temperature: I transferred the roast to the prepared roasting pan and carefully inserted a thermometer probe. I ensured the probe was as close to the center as possible, without touching the fat or the bones.
That's it for the preparation!
Baking the Rib Roast
I placed the rib roast in a preheated 500°F oven and cooked it for 20 minutes.
Then, without opening the oven, I reduced the heat to 325°F and cooked the roast until it reached an internal temperature of 140°F. This took about two hours and 40 minutes.

Once the roast reached the 140°F internal temperature, I removed it from the oven and carefully removed the temperature probe. Then, I tented the roast with aluminum foil and let it rest for about 30 minutes.
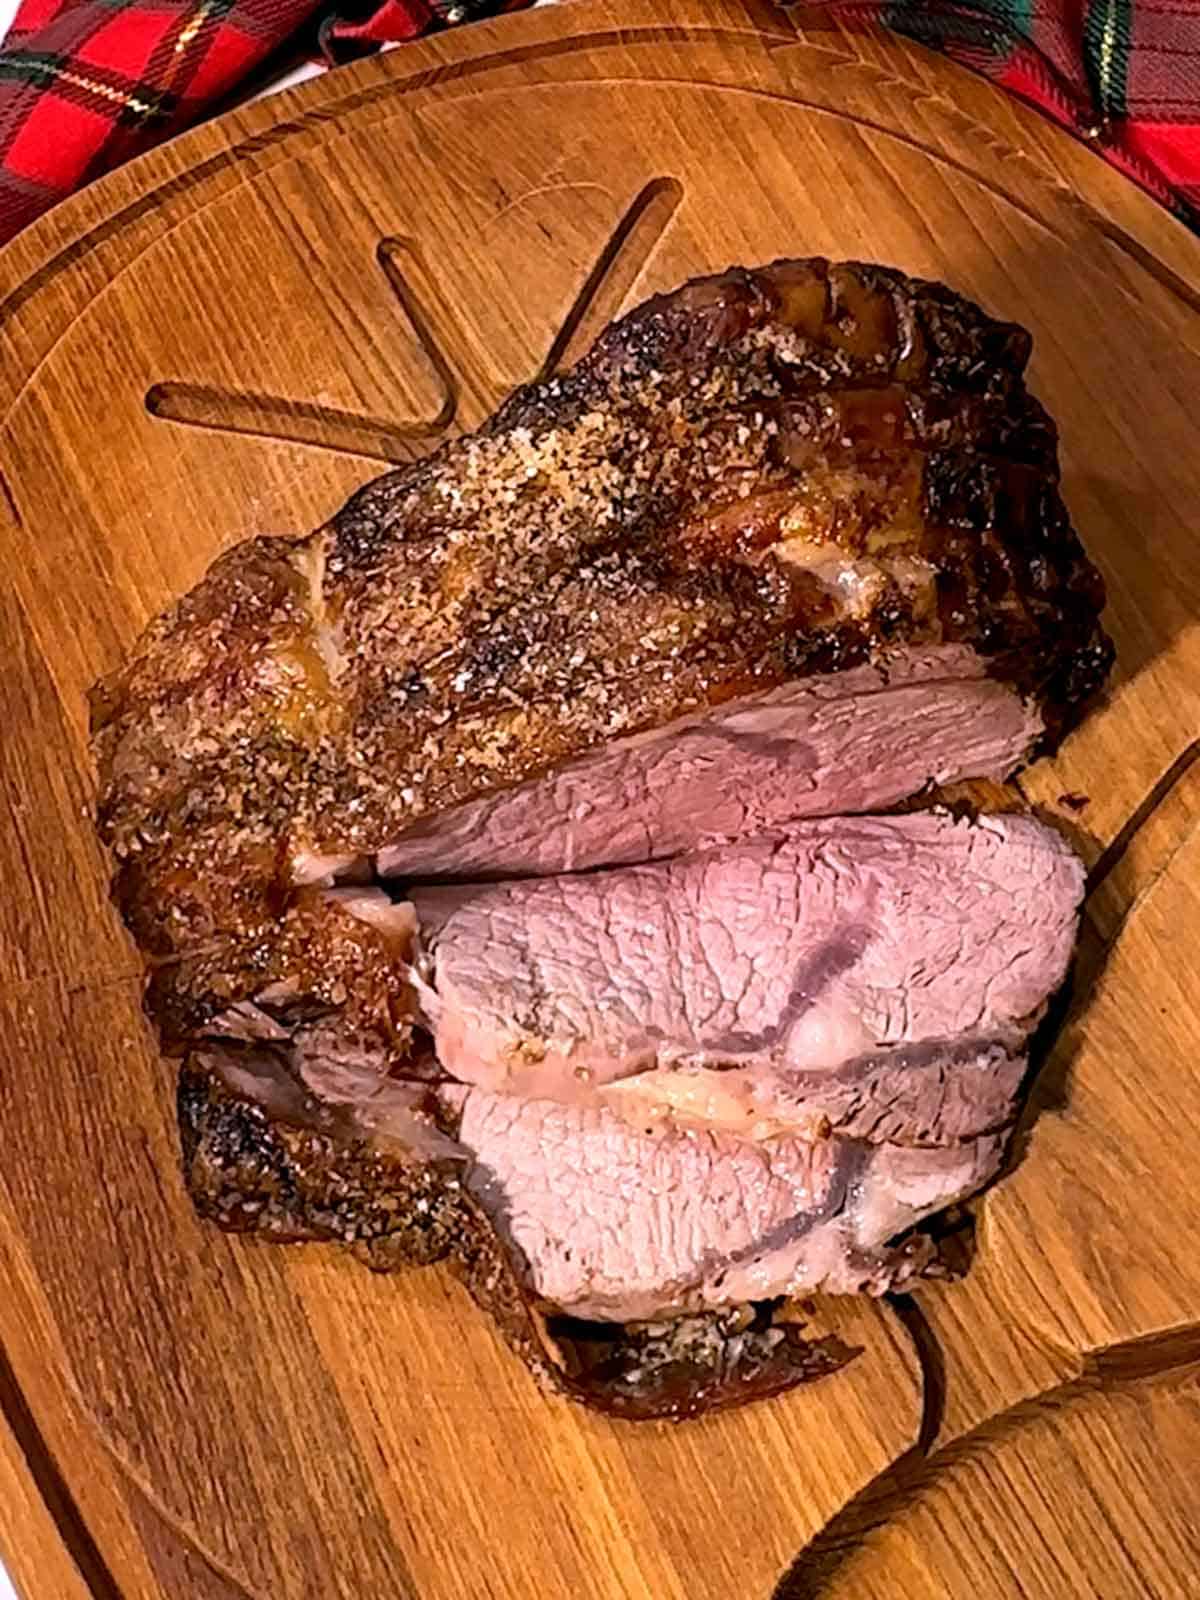
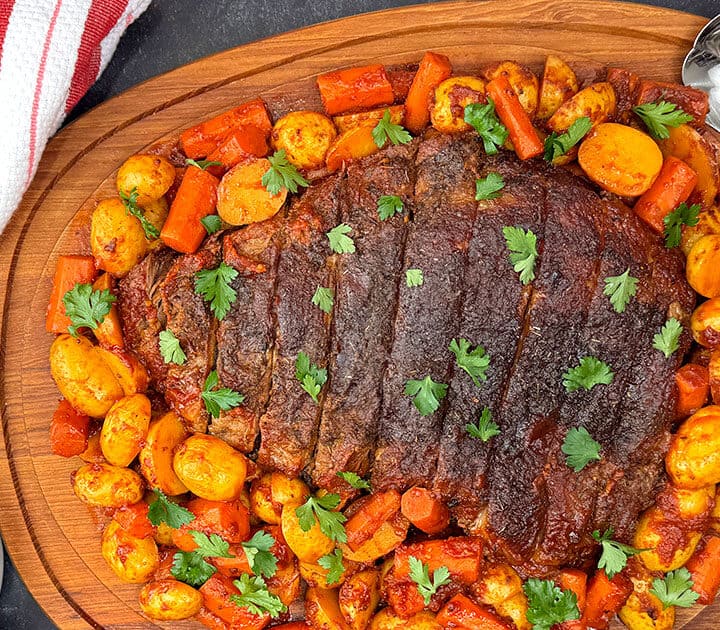
After allowing the roast to rest for 30 minutes, I removed the butcher twine that held the bones to the roast.
The moment of truth arrived. As Susan carved the roast, we saw it was perfectly cooked to our taste - medium to medium well done.
I served the rib roast with smashed parmesan-coated potatoes, steamed green beans, onion gravy, and mini popovers. Normally, I serve the roast with Yorkshire pudding but decided to use the mini popovers instead - the same great taste but a different presentation.
The rib roast was perfectly seasoned and cooked. It was juicy, tender, and a delicious, elegant main course for our holiday dinner.
Remember, the key to a successful rib roast is to relax, have fun, and trust the process. With some planning and these handy tips, you can impress your guests and create a lasting memory. Yum!

Frequently Asked Questions
You can use whatever roasting pan you have on hand, as long as it has a rack. One idea would be to use a quarter- or half-sheet pan with a wire rack inserted.
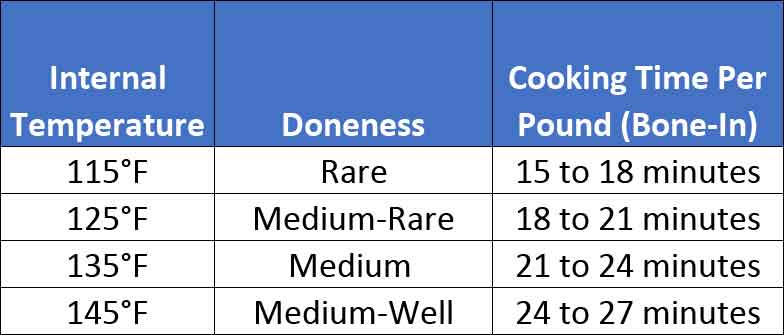
There are different preferences regarding the degree of doneness of rib roast. Also, the roast will continue cooking, adding about 5°F of doneness when removed from the oven. Therefore, it should be removed when the temperature probe measures about 5°F below the desired degree of doneness. The following is a rough guide for removal from the oven: Rare - 120°F; Medium Rare - 125°F; Medium - 135°F; Medium Well - 145°F.
A bone-in rib roast, also known as a standing rib roast, has the rib bones still attached. This adds flavor and helps the meat cook evenly. A boneless rib roast is easier to carve, but it doesn't have the same flavor as a bone-in roast.
You can trim some excess fat from the roast, but don't trim it all off. The fat helps to keep the meat moist and flavorful.
When the roast is allowed to rest, the juices redistribute throughout the meat, making it more tender and flavorful.
Leftover rib roast can be stored in the refrigerator for up to 3 days or frozen for up to 3 months. I like to make roast beef and Provolone cheese sliders with the leftovers!
Recipe Tips and Tricks
- Sear & Sizzle: Start by searing the outside of the roast at a high temperature (500°F) for 20 minutes. This locks in juices and creates a flavorful crust.
- Low and Slow: Reduce the heat to 325°F for the rest of the cooking time. Monitor with a meat thermometer. Use the chart below for a rough estimate:
- Good thermometer: Use a good meat thermometer for accurate internal temperature readings. Mine is a ThermoWorks Chef Alarm
- Best of both worlds: Get a bone-in rib roast and ask the butcher to remove the rib bones and tie them back to the roast if it doesn't already come that way. The bones help to insulate the roast, promoting even cooking and adding richness to the drippings. Carving is easier because the bones are easily removed once the roast is done.
Did you make this recipe? We'd love to know how it turned out! Leave a review below. Then, share a picture on Instagram and tag @pudgefactor so we can see it.
Don't forget to follow us on Pinterest, Facebook, YouTube, Flipboard, and Instagram.
Thank you so much for visiting PudgeFactor. We hope you'll come back!
Recipe
Want to Save This Recipe?
Enter your email & I'll send it to your inbox. Plus, enjoy weekly doses of culinary inspiration as a bonus!
By submitting this form, you consent to receive emails from Pudge Factor.

Perfect Rib Roast: Simple Elegance for Any Occasion
Equipment
- Roasting pan with rack
- Meat thermometer
Ingredients
- 5 to 6 pound Bone-in rib roast (See Tip 1)
- 1 ½ Tablespoons Kosher salt
- 2 teaspoons Freshly ground black pepper
Instructions
- Remove the roast three to four hours before cooking to allow to come to room temperature (See Tip 2)
- Line a roasting pan with a removable rack with heavy-duty aluminum foil. Add the rack and line the rack with aluminum foil. Poke holes in the top aluminum foil to allow the fat to drain away during cooking easily. (See Tip 3)
- Preheat oven to 500°F.
- Pat the roast dry with paper towels. Liberally coat the top and sides of the roast with Kosher salt and pepper. Use your hands to rub the salt and pepper into the roast. Insert a meat thermometer probe into the center of the roast, being careful not to hit either the fat or the bones.
- Bake in a preheated 500°F oven for 20 minutes. Without opening the oven, reduce the temperature to 325°F and continue roasting until the internal temperature reaches 140°F. (See Tip 4)
- Remove the roast from the oven. Carefully remove the temperature probe and tent the roast with aluminum foil for 30 minutes. Before carving, remove the butcher twine. (See Tip 5)
- Yield: 5 servings (See Tip 6)
Video
Tips/Notes
- If the rib bones are attached, ask the butcher to remove them, but tie the ribs back with butcher twine. If the ribs have been removed and tied back, you're good to go!
- It's important to allow the roast to come to room temperature (somewhat) before cooking it. This ensures a more even roasting.
- I've consistently used the technique of poking holes in the top piece of aluminum foil to allow the run-off grease to accumulate in the bottom of the roasting pan beneath the top layer of aluminum foil. This minimizes the smoke from the roasting and helps keep the oven clean.
- The time in the oven will vary depending on your oven temperature and desired doneness. In my oven it took the 5 ½ pound roast 2 hours and 40 minutes to reach 140°F. See the tips above the recipe for rules-of-thumb for cooking times.
- It's important to let the roast rest before carving it. This allows for an even distribution of the juices and promotes a moist roast.
- Store leftovers in the refrigerator for up to three days or in the freezer for up to three months.
Leave a Reply